Pages

Monday, February 27, 2017

Spring Snowman

Hello all and welcome! Tanya from Crafting on Caffeine here today. I'd like you introduce you to my Spring Snowman!  I've been wanting to make him but I'm so over the snow. Well, we just had a snowstorm of course and I thought, wait, a spring snowman! So here he is! 


I started with the "Spiral 3D Snowman" from JGW Made of Snow. I omitted the snowflakes  from the cuts.


Hope you enjoy! Please check back soon. LOTS coming up!!!

Friday, February 24, 2017

Lucky Leprechaun ~ with Cyndy G

Happy Friday, thank you for stopping by.  Today I am sharing with you a Leprechaun canister from JGW Spring Canisters.  This guy is so cute and just perfect for St. Patrick's Day.

3d Leprechaun box

I love how cute all the canisters are and that you can put treats in them.
I used some paper from Doodlebug's Happy Go Lucky paper collection.  I just love this paper.

3d Leprechaun box


Hope you have a wonderful weekend!  

New to SVG Attic?  Check out these awesome places!


Do what inspires you,
Cyndy

Wednesday, February 22, 2017

Bus Driver Appreciation Week

Hello all. I-team member Sonja here with two projects I made using the collapsible bus card from the JGW Back 2 School file. 

A few years back, I created the bus box from the SDS Gearing Up 4 School file for my son's driver at that time. I filled it with all sorts of little goodies that I think a driver needs. Like ear plugs and Advil. 

Last week was bus driver appreciation week for my son's school. He has had the same driver's for two years and I always like to do something special for them. Remembering the bus box I did a few years ago, gave me the inspiration to do this bus bucket set for their gifts!

 I decided to go with an all things yellow theme for their gift buckets. Why? Because we DEFINITELY could use some sunshine in these parts! Plus it matches the bus's so why not. 
 Each gift bucket has a chapstick, gum, two kinds of candies, a plant to grow, and a little duck.
 Each bus is the same with the exception of customizing a few things like their names on the side. 
I used my eBrush to spray subtle yellow highlights around each object on the light and dark yellow cardstock. 
 I added brads for the headlights and ran the chrome bumpers and silver lining of the wheels through my Sizzix Big Shot with a Darice embossing folder. 

 A few changes: I moved the stop sign to the drivers side and added a little extension arm so it moves. I added brads to the wheels for a little pop of texture. 
 The back of the bus, I wanted to have the message for each recipient. Plus I added tires and lights to match the front of the bus.
 Overall, I think they will enjoy their gifts and be able to keep the bus card for a long time. 
 I have it on a good authority that his bus driver from 2015 has kept a few of my projects on his desk when he was promoted! 
For more inspiration projects by me please visit: Sugar Bean Cards 

Materials Used: 

SVG Attic 'JGW Back 2 School
JGW Back 2 School
Core'd nations card stock
Silhouette Cameo 3
Silhouette Studio Designer's Edition
Sizzix Big Shot
Darice embossing folders
Craftwell eBrush
Sharpie markers
AC Elements Brads
Aleene's Original Tacky Glue
Teresa Collins Mega Runner

Monday, February 20, 2017

You are my cup of Tea Patch card with Angeline

Hi crafty friends.
Angeline here to share with you a card I made using the brand new JGW Sewn from the Heart kit.

SVG Attic: You are my cup of Tea Patch card with Angeline #svgattic #scrappyscrappy #sweetstampshop #cratepaper #card #cardmaking #papercraft #patchcard #teatime

I used the Cathedral Window 9-patch card and instead of folding the circles inwards, I did it outwards to create a different look. I also chose different patterned papers from the same collection so it would look cohesive.
Then I added some stamps from Sweet Stamp Shop, which I have already stamped, fussy cut and colored withy my copics.

Here's a close up of my card!

SVG Attic: You are my cup of Tea Patch card with Angeline #svgattic #scrappyscrappy #sweetstampshop #cratepaper #card #cardmaking #papercraft #patchcard #teatime


***

Thanks for stopping by and have a fantastic weekend ahead.
Angeline Choo
blog // facebook // instagram // youtube

Saturday, February 18, 2017

Shabby Chic Birthday Cake

Happy Saturday all!  Beth from Beth's Beauties here with you, and today is extra special because it is my birthday!  I decided I would make my very own birthday cake for the occasion ;)
 I started out with a 3D birthday cake file from SVG Attic's SDS 3D Cake Box Kit and papers from DCWV's Country Floral stack.
The three tiers are made with different papers and the flowers match the pink and yellow roses on the middle tier.  The small flowers were created using the Wooly Blossom 5 Petal Flower from SVG Attic's JGW Winter Wonderland set. For those, I cut 2 layers of petals at 1.5" each.  I spritzed them with water, scrunched them and let them dry before assembling.
The cake topper rose is much more full, but it also is created from the Wooly Blossom 5 Petal Flower from SVG Attic's JGW Winter Wonderland set.  I used 8 layers on this one, two of each of the following sizes:  2.36", 2",  1.64",  1.28".  I also misted these with water and scrunched them prior to assembly.
The fun part is that the bottom two tiers are actually boxes that can hold gifts!  I think I am going to have to get some chocolate to hide in these layers to make a stash just for me ;)
I hope you have a wonderfully crafty day!

New to SVG Attic? Check out these awesome places!

Friday, February 17, 2017

St. Patrick's Day Hats with Lisa


Hi, everyone and welcome. Lisa from The Relativity of Paper bringing you today's inspiration.
It's one month till St. Patrick's Day so I thought now would be an excellent time to get started on those St Patty cards. These cards are so simple to make and to be honest that's the reason I went with them for today's inspiration. I really should be in bed resting and getting over this horrible cold but here I am and here are the two cards I created using the SDS Charmingly Green - Leprechaun Hat Card.


 I used two shades of green cardstock, black cardstock, and gold from my stash. There really isn't much to making these cards, but they are so cute. You could emboss them with shamrocks, use them for a Mad Hatter Tea Party by only adding a white rectangle with 10/6 wrote on it, the possibilities are endless. 

As always, thanks for joining us! 

Wednesday, February 15, 2017

Bride's Maid Luncheon with SVG Attic

Tracy here and this week we are getting ready for a Bride's Maid Luncheon.

My daughter asked me to put together a little center piece and gift bags for Saturday.


Although these are not really her colors I loved the gold, cream and black together and how elegant they looked.


The gift bag was created using the Valentine Treat Box from the new 

JGW Heartfelt Delivery

This is a bran new set that has some really fun files in it.  Check out the mail truck, you can use it year round!

Instead of the words "be mine" I added Thank you and cut them out of Gold Foil Vinyl from Cricut.
Loved it.

The box is made to hold a little box of valentine candy but it fit the jewelry boxes she had perfectly..


The 3 Tiered cake was a lot of fun to make and we are both very happy with the way it turned out.
The file is from the SDS 3D Cake Box Kit and the flowers are from the  JGW Tropical Haven set.


I cut the flowers from Gold Foil paper and Black Glitter paper.
Use small brads to hold them together then glue them to the sides of the box.
I am excited for the way these turned out and my daughter loves them too.

If you have a wedding coming up, there is lots to do.  Make sure you have fun while your are doing it!

New to SVG Attic? Check out these awesome places!


Monday, February 13, 2017

So Tweet Planner layout

Hello all! Are you ready for Valentine's Day? Tanya from Crafting on Caffeine here today and I have a planner layout to show you. 
I used several elements from SDS Tweet Love Collection.


I love decorating up my MAMBI happy planner. I haven't thought to use SVG Attic files til now. I'm in love!


Paper used is from BoBunny Crazy Love collection.


Friday, February 10, 2017

Springtime Bunny ~ with Cyndy G.

Happy Friday, thank you for stopping by.  Today I am sharing with you the wonderful  JGW 3d Button Jointed Bunny.  I just love the 3d figures.  I decided to shrink my bunny, I cut her at 70%.  She is about 9" tall (top of head).  I also used the garden hat from JGW Gaby's Garden and glued her ears to it.

3d paper bunny

I used Trendy Twine, Twisted Blue Berry around the brim of the hat and to tie her joints together.  The paper is Graphic 45, Robin's Egg from Botanical Tea.

3d paper bunny with hat

I also used some flower buttons I had in my stash.  I just love how everything came together.  Thank you again for stopping.  Have a crafty weekend.

Do what inspires you,
Cyndy G.

Wednesday, February 8, 2017

Apollo Rocket of Love

I-Team member Sonja here with an extra special take on the 3D rocket from the 'Outta this World' file. 

Originally I started out making this for my husband for Valentine's day. However, since I told him I didn't want anything, he told me if I made him anything he would throw it away. Mainly I think he was at a loss. If I surprised him with something, he thought he would be in trouble. He did not, however, say anything about our anniversary!

 The 'Apollo Rocket of Love' sentiment comes from one of his favorite TV shows and was the inspiration for the entire project. 

For the card:

For the card, I embossed the wings with a heart sleeve and the bottom with a swirly sleeve. The center of both rockets (star foil) is from Rinea Foil.

I decided to add brads and a frame around the two windows just for added texture, as well as pop up tabs for the hearts. 

Rocket: 

And here is the main event....

 This rocket is spectacular in any color, but for some reason gold came to mind. I am happy that I decided to do the Rinea Foil in the middle of each rocket to help break up and add texture to the gold. The brads just make it look even better!


The entire rocket is gold with accents of gold brads. I wanted to put gold candies inside, but I ran out of time. 

When he finally remembered it was our anniversary, I gave it to him. He gently placed it in the garbage can as a joke (twice), but he loves it I think. Stubborn man is worse than a mule! 

For more projects by Sonja, please visit Sugar Bean Cards blog.

Materials Used: 

SVG Attic's 'Outta this World' file
SVG Outta this World
4 sheets Recollections gold foil paper (Michaels)
Rinea Foil
Recollections gold Brads
Silhouette Cameo 3
Silhouette Studio Designer Edition
Scotch ATG gun
Aleene's Original Tacky Glue

Monday, February 6, 2017

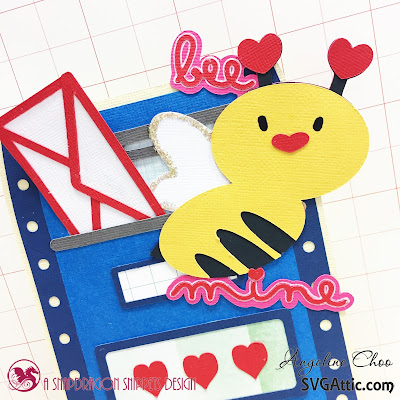
Bee Mine Valentine with Angeline

Hi. Angeline here to share with you a Valentine card I made for my hubby :)

I am using these beautiful kits:

SVG Attic: Bee Mine Valentine with Angeline #svgattic #scrappyscrappy #valentine #card #cardmaking #valentinecard #papercraft #svg #diecut #beemine

I combined the mail drop box card and the Bee-mine card and made it one! :) Coz both were just great I couldn't pick one haha.

I decided to keep the colors simple and make the focal point (the bee) stand out more. I am loving just how cute the bee looks! I also added some glitter to his wings.

SVG Attic: Bee Mine Valentine with Angeline #svgattic #scrappyscrappy #valentine #card #cardmaking #valentinecard #papercraft #svg #diecut #beemine


***

Thanks for stopping by and have a fantastic weekend ahead.
Angeline Choo
blog // facebook // instagram // youtube

Saturday, February 4, 2017

Valentine Treat Boxes with Beth

Hello crafty friends!  Beth from Beth's Beauties here with you today.  Every year I create treat boxes for my boys' teachers and this year is no different!  I went with two different box styles this year.
 This first box can be hung on a door, but I think it works just as well as a cute handle :)  It is a file from the Heart Shaped Boxes set.
 This second box is also from the Heart Shaped Boxes set!  I didn't want the heart cutout from the first box to go to waste, so I popped it up with foam tape on the front of this one.  I kept both of the boxes simple, by just adding bows of white crinkle ribbon.
And here is the set that these files came from:

Want to check out all of SVG Attic's Valentine's Day files?

I hope you have a wonderfully crafty day!

New to SVG Attic? Check out these awesome places!

Friday, February 3, 2017

Sending Owl My Love with Lisa


Hi, everyone and welcome! Lisa from The Relativity of Paper sharing a fun way to use Give A Hoot SVG Collection and Tent Cards SVG Collection. This is a great project to get the kids involved, and it comes together quickly. 


I started by picking fun patterned papers for Valentine's Day, but you could make these for any occasion.
Once I decided on the papers I used white 12 x 12 cardstock to cut the Tent Card, Kraft cardstock to cut the limb, red cardstock for Owl along with the patterned papers. 

To create the branch simply take one of the tree trunks from the Give A Hoot Trees and turn it to create your branch. I did a little woodgrain embossing on mine. To create the hearts I used the heart tree and size the hearts down.  

You can use a goodie bag or Project Life Pouch to hold your goodies. Layer the Owl and finish off with googly eyes! Easy-peasy, right? 


You can find more details on my blog, The Relativity of Paper

As always, thanks for joining us! 

Wednesday, February 1, 2017

Valentine Heart Box

Welcome to February, the month of love!
Tracy here, from the Idea Closet and today for my SVG Attic post I am excited to share a beautiful Valentine's day project.


This heart box reminds me of my Grandma.  
Grandma had a couple of old vintage heart boxes, that my grandpa had given her.  Since she was one who always found a way to  re-purpose something, her boxes were decorated with buttons, bows and scraps of lace.  They were beautiful storage boxes that held letters, cards and other important items.
So when I first saw this heart box, I knew exactly what I wanted to do with it.

The box is part of the JGW Vintage Valentine Collection


You can follow Jodi's instructions here to cut and put it together.


I doubled up the inside liner pieces and it made the box very sturdy.
By using double sided printed cardstock for the sides, even the inside looks finished.


The paper I used is Bo Bunny Sweet Moments.
To finish it off, I used some of the elements from the Lid Embellishments but then I added flowers from the G is for Gratitude Collection and 2 keys from Snapdragon Snippets that can be found in the Silhouette store.
I cut two of each key to make them thicker.  I also used the small hearts from inside the key and added them to the lid as well.

Tie the tag and the keys with some baker's twine and you have a beautiful keepsake heart box.
What will you hold in yours?


New to SVG Attic?  Check out these awesome places!