Pages

Wednesday, September 12, 2018

Perfect Pumpkin Projects


I don't really love fall. 
Here in Salt Lake, it seams like we get 5 days of fall and then winter hits!

But I do love Pumpkin!


So today for SVG Attic I created 2 projects featuring those beautiful pumpkins.


The first project is the Folk Art Pumpkin Patchwork card.

This is such a pretty card. 
If you love quilts or patchwork, Jodi has some beautiful quilt blocks and patchwork images.


The Pumpkin Block 3D Box, is another fun and easy file.
I made mine a little bit smaller and then distressed the edges.


The best part of this project is its made up of three smaller boxes.
The boxes can be filled with small treats or  gift cards.
Tie the boxes together and give as a gift to someone special.

I hope you enjoy these pumpkin projects as much as I have.
Thank you for joining me today.


Monday, September 10, 2018

Trio Birthday Cards with Beth

Hello my crafty friends!  Happy Monday.  Beth from Beth's Beauties here with these three trio cards.
 I really love this side profile sunflower trio card that is part of the JGW Sunflower Sunshine kit.  I used papers from Fancy Pants' Time for Spring 6x6 paper pad and wrapped Krazy for Kraft Trendy Twine around it.
 The other two cards are for nephews of mine.  The patterned papers on both are from DCWV's Boyhood stack.  The rocket trio card is from SVG Outta This World kit.  I embellished with Rainbow Glossy Dots and stamped a sentiment from Pretty Cute Stamps' Super Sentiments stamp set.
 The final card is the Baseball Bat Trio Card file and is embellished with Berries Jubilee Trendy Twine and the stamps I used are from Pink and Main's Birthday Wishes stamp set.
I hope you have a wonderfully crafty day!

New to SVG Attic? Check out these awesome places!

Sunday, September 9, 2018

Bewitched Cake Stand

Hello (waving enthusiastically) … just sneaking in today to show you a very fun project I've been working on this last week.

I got the idea from a friend who showed me this picture:

First I thought "corny" but then I kept thinking about it and wondering if it could be made in paper. And....yeah it could!

Roaming through files I found that SVG Attic had the right files for it, so I started building.

I wanted mine to be a Halloween inspired Cake Stand and I gathered the files I needed for this: The 3D Witches Boot from the JGW Bewitched Botique kit, the Sunflower 3D Cake Stand from the JGW Sunflower Sunshine kit and the Cats & Pumpkins Hollow Centers Wreath

I also made the Mini-Candy Cauldron also from the JGW Bewitched Botique kit to sit on top of the stand - I would have liked a cupcake but just didn't feel like baking.


This is how it turned out:


It's made from AC Cardstock in Leaf, Black, Melon, Grape, Carrot and Charcoal along with some Purple Pearl Paper, Gold Foiled Cardstock and patterned paper from Doodlebug's Collections "Boos and Brews" and "Booville"

I used the stem part from the Cake Stand to make the legs (just made it a bit longer) and added some glitter tape onto for striped socks. Inside the legs are two 3/4" dowels for support.

The top part of the cake stand is reinforced underneath with 4 platform shaped pieces and the legs are glued unto it with hot glue. I chose to use the Cat and Pumpkin Wreath to place on the top for a fun decoration.


The boots are downsized by 50% to fit the size of the Stand and the legs are glued into them also with hot glue. I added some glas stones into the boots for weight so the whole stand gets more sturdy.

I used twine, various Doodlebug sprinkles and the small patches etc. that comes along with the boots.


For the Cauldron I used gold foiled cardstock for the handle and chose to use the spider tag on which I doodled two small eyes and added a black gem.


Actually it's a pretty easy projects when you think about it - it's all about getting that idea. Thank you Sandy for providing me with it.


Thanks for joining me today - I really hope you like this wacky project. A fun centerpiece on the Halloween table or as decor in the living room….endless possibilities.

New to SVG Attic?  Check out these awesome places!


Friday, September 7, 2018

Steampunk Gears ~ with Cyndy G

Good morning.  Thank you for stopping by.  Today I am sharing a project using files from SVG Attic.  I used the gears from Steampunk Gears Cogs and Sprockets 3 as the base for my Steampunk Debutante wall hanging. 

Steampunk wallhanging


I added a solid background piece by breaking apart the main gear and removing all the extra pieces.  I cut three layers for the back for added stability. 

Steampunk wallhanging


Steampunk wallhanging


I fussy cut pieces from the Steampunk Debutante paper collection by Graphic 45 and added some metal embellishments.  I also used Mod Podge to protect and harden my finished project.  Thank you for stopping by today.


New to SVG Attic?  Check out these awesome places!


Do what inspires you,
Cyndy G

Monday, September 3, 2018

Happy Labor Day

Happy Labor Day everyone!  Tanya from Crafting on Caffeine.  I created the eagle from SnapDragon Snippets JGW American Eagle Wreath.  I love how you can make it using any colors.


All paper used is from DoodleBug Designs.
I put it on a flag that I got from craft store and then I chalked on it with Chalk Couture.


Sunday, September 2, 2018

Autumn Wind

Nothing is more beautiful than Autumn - in my opinion anyways. I just love this season! The colors are amazing and astonishing, the light is so warm, sky blue, wind is cool and then there is the promise of cold snow….ahhhh can't wait!!!!

It is also the season for storms and lots of wind. The best time of year for the Wind Turbine industry at least here in Denmark and we have lots of Wind Turbines. My hubby works in the industry….so I know this is a busy time of year.

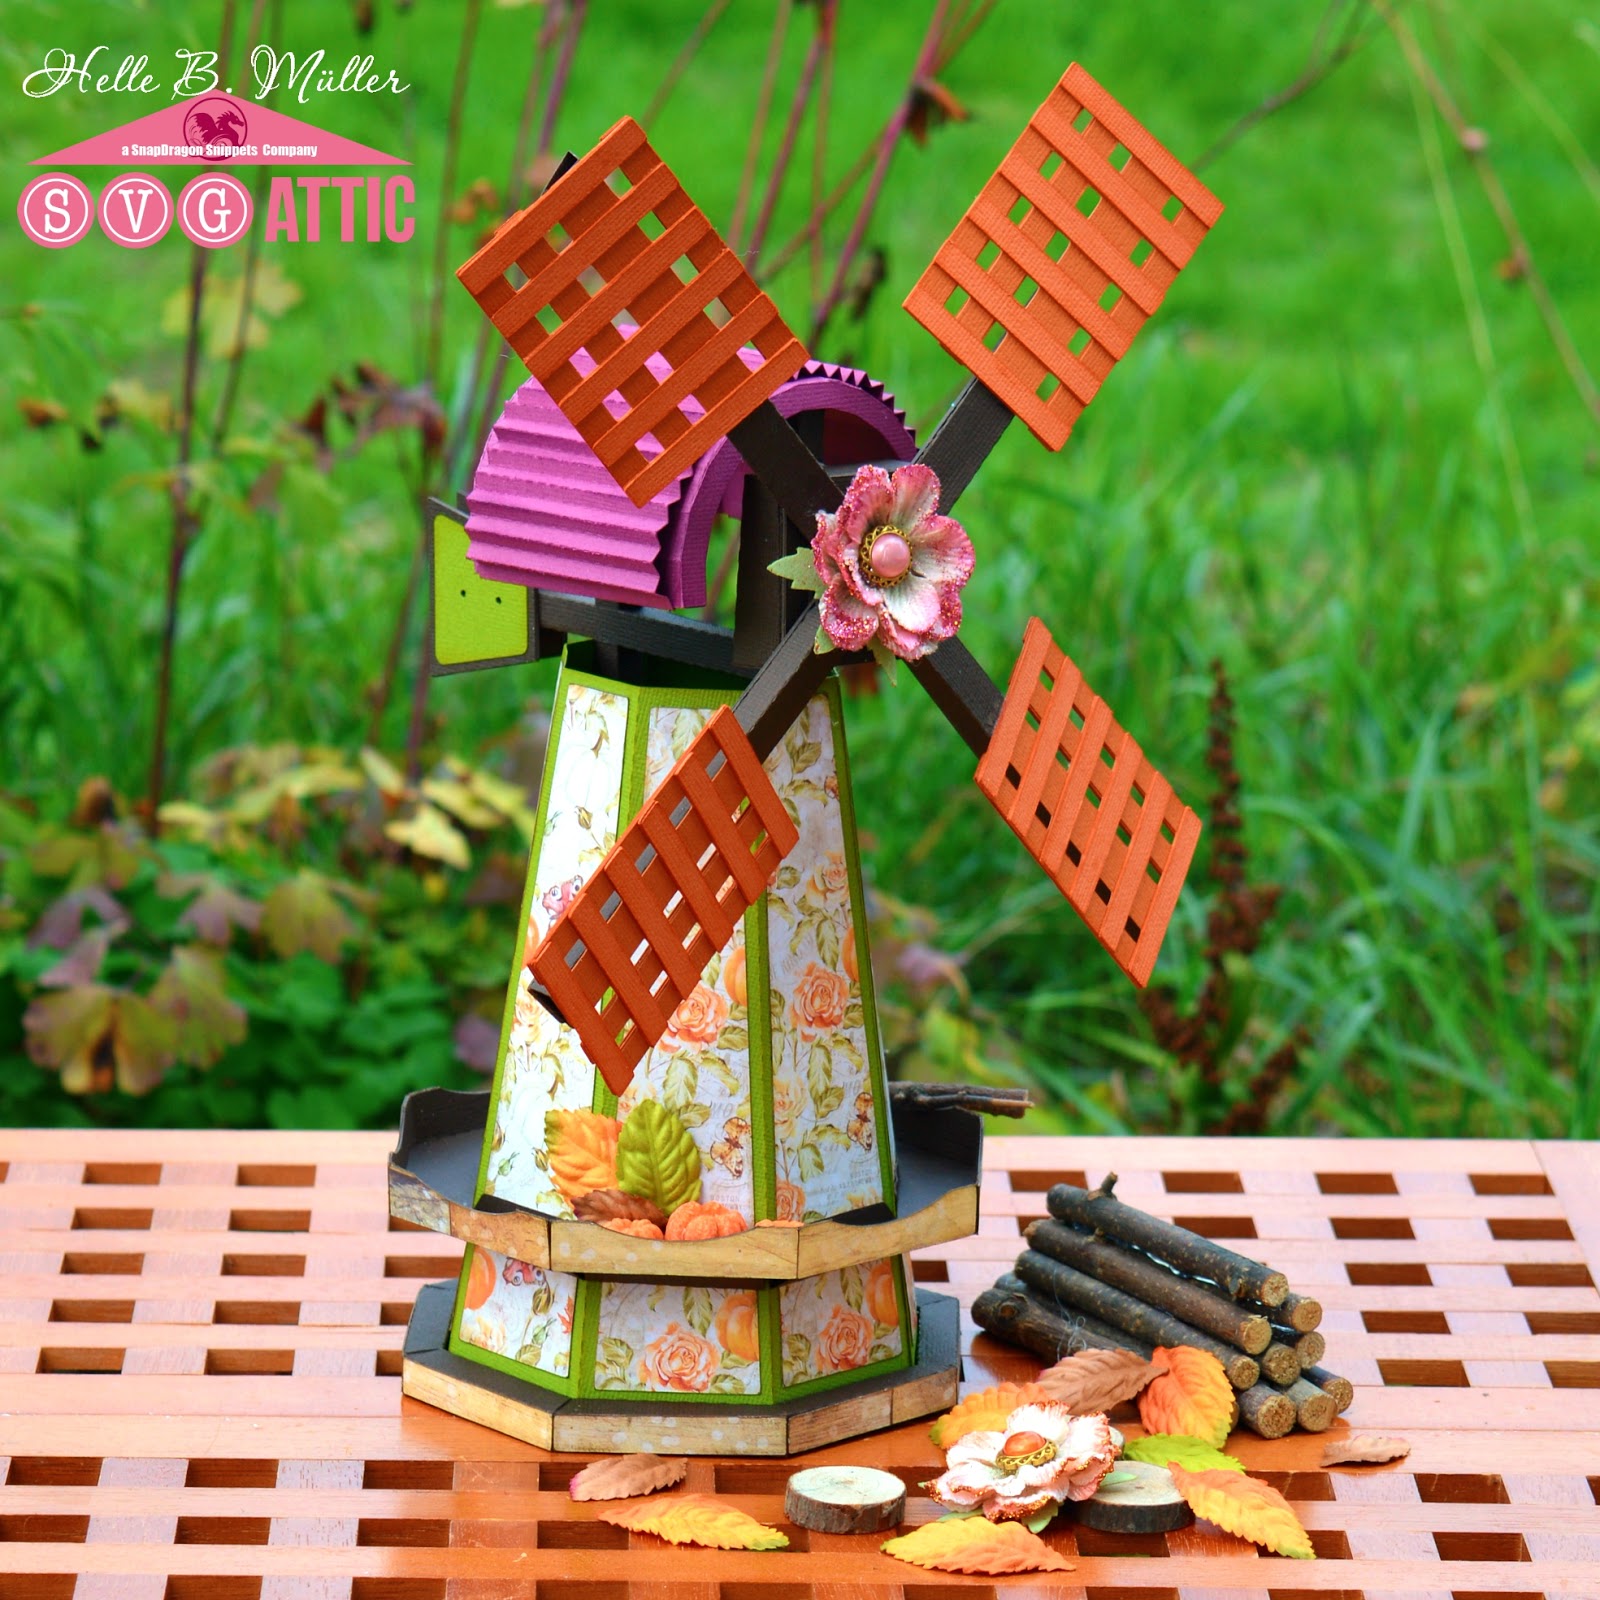
Now I don't have files for a Wind Turbine....at least not yet (*wink* *wink*) but Jodi made the most gorgeous Dutch Windmill this Spring (find it in the Dutch Treat Kit), and that is close enough. So I tied the two together - the season and the Mill and got a beautiful Autumn 3D Windmill:


I made this out of AC Cardstock in Coffee, Leaf, Wine and Apricot along with patterned paper from Prima "Amber Moon" - a gorgeous collection from last year.

I found it fairly simple to make and assemble but you have to follow the tutorial (found here) thoroughly as it's a complex but very genius construction.

I inked all the edges with distress ink from Ranger and chose to use hot glue for the attachment of the wing part.

Then I decorated with some small pumpkins from Ideaology and leaves from Prima along with a large Prima flower


I really love how versatile this Mill is - just ready to be decorated for whatever season or holiday.


This Mill actually went to a lady in the Netherlands - the Mother of my son's gamerfriend. I thought it very fitting to give it to her as a thank you for her welcoming Magnus into her home in February when we visited and for letting her son join Magnus and his Dad on a trip to Germany a couple of weeks ago, where they visited a Gamer Convention.


Ok - enough from me today. Hope you enjoyed it and please do leave me a small comment below. I love to hear from you.

New to SVG Attic? Check out these awesome places!


Friday, August 31, 2018

Autumn and Halloween Diamond Cards


Hi and welcome back everyone. Lisa here from The Relativity of Paper sharing a few cards I created using the Double Diamond Card from the JGW Welcome to Booville Collection.  This card is unique in shape and I really enjoy using it. Last year I created a Pirate themed card that would be perfect for a party invitation using this same card base, you can see it here. 


The envelope for this card is so easy to customize. I love that I'm able to use matching paper on it. 

Here are the cards I created, one for Autumn and one for Halloween. 


Here you see the diamond shape that makes this card so much fun. The paper and die-cut pieces are from Pebbles Midnight Haunting Collection. You can head over to my blog for all the product details. 

Using my Silhouette Cameo I cut out the Double Diamond Card base using Cardstock Warehouse Oatmeal Kraft paper, cut the accent pieces using 6 x 6 patterned papers from the Pebbles Midnight Haunting Collection, added black ribbon and enamel dots to dress the cards up a bit. I stamped the word Autumn using Versafine Onyx Black Ink. The matching envelopes were cut using the same Cardstock Warehouse Oatmeal Kraft paper and Pebbles Midnight Haunting papers. Card and envelope bases were assembled using quick dry adhesive. Embellishments were added using 3D mounting foam. Enamel dots are self-adhesive but I add a dot of quick dry adhesive. 


As always, thanks for joining us!