Pages

Saturday, January 30, 2016

Dinosaur Invasion! with Beth

Good morning!  Beth from Beth's Beauties here.  I am taking a break from holiday postings to just share some fun projects I recently created with SVG Attic's files.  As a boy mom, I LOVE the fact that SVG Attic has several boy themed sets to create with.  This time I went with a dinosaur theme. 
For this dig zone hat, I used a file from the JGW Dino Dig set.
 I tried to make it look like a paleontologist hat, so I stayed true to those colors.
 Here is a look at the side of the hat.  It was big enough that it fit my 3.5 year old with room to spare!
 Next, I made some dino face cards from files in the JGW Dino Party Kit.  I think these are so much FUN!  The mouths open to reveal a message inside.
 The T-rex...
 Triceratops...
 And the Pteranodon.
I used DCWV's double sided cardstock for all of these projects and for the cards, I embellished them with some homemade enamel dots.  Other than that, I kept things pretty simple!

I hope you have a wonderfully crafty day!
Beth
Beth's Beauties

Friday, January 29, 2016

Dino Mike ~ with Cyndy G

Happy Friday!  Today I am sharing the T-Rex 3D Figure from the JGW Dino Dig kit.  This was a special request from my youngest son for his birthday.  So I asked him "What color would you like your dinosaur?"  my son replied "Red and blue."  Really???  These aren't the first colors that come to mind when you think of a dinosaur but I like the finished project.

3d paper dinosaur

This file was so fun to make and not to complicated.

3d paper dinosaur

Just as you would expect T-Rex was a huge hit.

Young boy holding 3d paper dinosaur

Thank you for stopping by :)


Do what inspires you,
Cyndy G

Wednesday, January 27, 2016

Love Potion Bottle with Tracy

Good morning fellow crafters! Tracy here from the Idea Closet and today I have a fun project from a new kit that will be offered at SVG Attic later this week.

Love Potion Bottle


This project is so cute just the way it is. It comes with either a printable label or one that can be cut out and layered. The bottle stands almost 12 inches tall. There is a "back door" to make it easy to fill with candy or a small gift and you can even place a real 1" cork in the top.

As always Jodi has put together a great tutorial on how to put your project together. You can find all the instructions here.

To make my bottle I added a couple of things.

First, I printed the label  on clear sticker paper, but then I did a very tiny offset around it so I could have a small white frame around the label.
Place the label sticker on the white offset frame and then place both of them on the bottle when the instructions tell you to.

Next,  I ran the neck pieces through my Big Shot and embossed them.  The embossing adds a lot of detail to the bottle.

For the final touch, I used 2 basic key shapes and tied them to the bottle with string. You could add charms or even a tag.  Add a white fluffy bow  tied from tulle and tada ... a fun bottle to  use as a center piece or fill it with candy and give it to someone special this Valentine's day.

This fun bottle will be part of a  full Valentine Kit, available in the next few days  at SVG Attic.

So many possibilities. I have a bridal shower coming up next month... Hmmm.. Stay tuned.....

I hope you will give this project a try and thanks for joining me today!
Happy Cutting


Monday, January 25, 2016

Baby Boy Card with Angeline

Hello! :)
Angeline here to share with you a baby boy card I made using the Baby Boy kit.

SVG Attic: Baby Boy Card with Angeline #svgattic #scrappyscrappy #babyboy #card #svg #cutfile

I used the cupcake toppers and put it on my card instead and I added some foam tape to it for that extra POP! The sentiment I got it from the banner and shrunk it to fit my card.

SVG Attic: Baby Boy Card with Angeline #svgattic #scrappyscrappy #babyboy #card #svg #cutfile

Want to make a baby girl card instead? No problem!
SVG Attic has a Baby Girl kit too.

Angeline Choo
blog // facebook // instagram // youtube

Friday, January 22, 2016

4 Quick and Easy Valentine's Day Cards with Lisa


Hello everyone! Lisa, from The Crafting Cave, with you today. 
I have four fun Valentine's Day cards to share using


What's so quick and easy about this, right?
SVG Attic Sweetheart Caption Valentine's Day Cards
All bases for the cards are the same. Kraft cardstock cut to 4.25 x 5.5 matted with white cardstock die cut. You can cut and assemble the bases quickly.
SVG Attic Sweetheart Caption Valentine's Day Cards
Okay, I know what you are thinking. That's a lot of layered cutting. Here's a tip to make it quick.
Once you decide which captions you want to use go ahead and pull them onto the screen in the software you use. I group all the components of each caption together to re-size(so I have four groups). Once re-sized, you can pick out the layers you want to cut with each color cardstock. Ex. The first two cards bottom layers are red along with the lips and hearts on the third card. Arrange them to cut on the red cardstock at one time. Cutting by color is much quicker than cutting each caption separately. 
SVG Attic Sweetheart Caption Valentine's Day Cards
Once you started cutting the layers you can begin assembling while the other layers cut. 
SVG Attic Sweetheart Caption Valentine's Day Cards
You can cut these four captions easily in 10 minutes or less. Just be sure to gather all 
your supplies and have them handy when you start. With the card bases assembled ahead of time you can attach each caption once you have it assembled. I finished off with a little bling on each card. 
You can find more details on  my blog, The Crafting Cave.
Great project to let the kids help with. 

Hope you enjoy! 
As always, thank you for joining us and have a great weekend.

Wednesday, January 20, 2016

Vacation Countdown Calendar

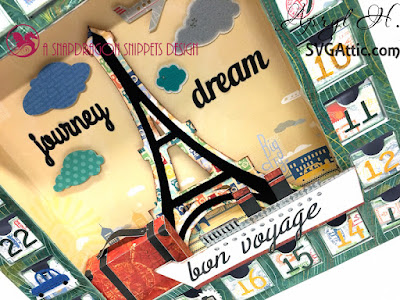
Hello SVG Attic fans! It's Apryl with the Guest Design Team sharing another fun project!  I call it the Vacation Countdown Calendar.  I took the Christmas Advent Calendar and gave it a makeover!  This is a fun way for the family to do a vacation destination reveal by hiding hints in the calendar each day, or a way for each family member to share what they want to do and see while on the trip.  


The advent calendar design is from the Christmas Advent Calendar kit and instead of using the Christmas tree and packages in the center shadow box portion, I used the SDS Paris Voyage kit.  The suitcase, Eiffel Tower, and cruise ship are in this kit along with "journey", "dream" and "bon voyage". 


This was really fun to put together.  The paper is a combination of Basic Grey's Wander collection and Little Yellow Bicycle's The Escape Collection.  There were some great embellishments from these collections that I incorporated into the calendar:  clouds, airplane, camera, advent drawer numbers.  


Most kids LOVE advents and mine are dying to use this one!  They can't wait for us to plan our next vacation just so they can use this countdown calendar.


If you are looking for something different and fun to do, this is a project for you!  

Bon Voyage!


Monday, January 18, 2016

Roses+Chocolate= Valentines

I am a sucker for romance and what is more romantic then Valentine's Day? Tanya from Crafting on Caffeine here today. I had so much fun putting this together. Hope you enjoy!


I used the following files to put this together:
Candy Wrappers- SVGA Sweet Shop Party


I re-sized the candy wrappers to make them smaller, fit to be cut out of a 5x5 paper. So cute. 


For the Rose I used my eBrush to add the highlight to the petals. 


Couldn't have finished this project without the following; 
Heart Shaped Basket - DCWV Paper 

Thank you for stopping by and hope to see you all back soon!


Saturday, January 16, 2016

Sweetest Heart Box Card with Beth

Beth from Beth's Beauties here with you today!
I created the beautiful box card and matching envelope that is in the JGW Sweetest Heart set.  I absolutely love the chocolate that is on this card :)
Here is a look at the card itself.  The papers I used are My Mind's Eye Lost and Found and the glitter cardstock is DCWV's Glitzy Glitter.
The front panel is embellished with a few sequins and I added a bit of lace behind it to add to the antique look of the card.
A closeup of the chocolate...doesn't it look good enough to eat?  I added glossy accents to the swirls to make them shine.
The side flaps are shown below.  I added a bow of cherry cupcake Trendy Twine to the heart.
Here is the envelope.
The best part is that the card folds flat for mailing!
I hope you have a wonderfully crafty day!
Beth
Beth's Beauties

Friday, January 15, 2016

Mon Amour - with Cyndy G

Hello crafters today I am sharing some more Valentine projects with you.  I made the Rose Bouquet box card from JGW Flower Boxcard Bouquet.  I think these flower box cards are beautiful!

Paper rose bouquet box card - JGW Flower Boxcard Bouquet

I also made the Flip top heart box from SVG Heart Shaped Box kit.  This little box goes together so quickly.  I think it would be the perfect project to do with your children.  You could make this a small size and make them for the classroom, they are that easy to make!

Heart shaped box - SVG Heart Shaped Box kit

I used the beautiful Mon Amour paper from Graphic 45.  
I love the way I got the paper to line up on my box card!  

Rose bouquet box card and heart shaped box

I really had fun making these projects.  I hope you will share some of your projects with us.

Do what inspires you,
Cyndy G

Wednesday, January 13, 2016

Winter Fun with Tracy

Tracy here from The Idea Closet and I am so excited to share my newest creation with you.

Today I am celebrating the cold and snow that is happening outside my window.


To create my project I used two different files from SVG Attic

JGW Winter Friends Canister


(one of my favorites that I have used many times)


The Canister was easy to do. Jodi gives perfect instructions here, All I had to do was cut it out and assemble.  
I wanted it to be a little different so I used purple and blue papers instead of your typical black.

I also added two snowflakes to the hat with foam pop dots and left the heart off.  
This was an fun project and it went together really quickly.

I am going to have to make all of the canisters now because I loved how cute it turned out.


The second project took a little more time but still wasn't difficult.
First I created the wreath stand.  
*Make sure you fill the bottom with something heavy before you close it all up. I used dried black beans.  The wreath is a little heavy and the stand tipped over before I put the beans in it. 

To make the wreath,  use two circles to create a base.
Next, make a bunch of copies of the snowflake from the canister set.  
Create 3 different sizes and then cut them from white, grey, light and dark blue and purple card stock.


Glue the largest snowflakes to the bottom of the wreath.
Add layers of more snowflakes using Foam Pop Dots to fill in the wreath until you get the desired affect you are looking for.

For the finishing touch, lightly spray the wreath with spray adhesive and then shake glitter across it.
(Not to much, its just to add a little shimmer to the snowflakes.)

When everything is dry, hang your wreath on the hanger and watch as everyone oohs and awhs!

Come on over and visit me at The Idea Closet and...
Happy Crafting!


Monday, January 11, 2016

Soaring Eagle card with Angeline

Happy Monday.
Angeline here and I am back with my first post for the New Year! 

Today I combined a few sets to create this interactive birthday card. 
Look look!
You can pull it up and the eagle soars! :)

SVG Attic: Soaring Eagle with Angeline #svgattic #scrappyscrappy #birthday #eagle #card

I made this card for my dad using the JGW Above it All kit because he loves eagles and I thought it'd be cool to make it soar. I also added a little heart to the eagle instead of on its wings using the JGW American Eagle Wreath kit. The happy birthday sentiment is from the JGW Dino Party kit.

Here's an up close of the magnificent eagle.

SVG Attic: Soaring Eagle with Angeline #svgattic #scrappyscrappy #birthday #eagle #card

Thanks for stopping by and have a wonderful 2016! 

Angeline Choo
blog // facebook // instagram // youtube

Friday, January 8, 2016

Love Is In The Air with Lisa


Welcome, welcome! Lisa, from The Crafting Cave, sharing a few treat bags I created using the Heart Window Tall Tote from the JGW Sweetest Heart Collection.  I know it's a little early but it never hurts to be ahead of the game, right? 

  
SVG Attic JGW Sweetest Heart Heart Window Tall Tote
 I went digging in the depths of one of my paper drawers and found 
these gorgeous papers by MME Cupid's Arrow. 
SVG Attic JGW Sweetest Heart Heart Window Tall Tote
The bags are very easy to cut and assemble.  If you are using double sided paper you could use one sheet of 12 x 12 paper to cut everything. Very few supplies are needed 
to create these gorgeous bags.
SVG Attic JGW Sweetest Heart Heart Window Tall Tote
I just added silver brads, red/white twine and white ribbon.
I moved the red hearts on the white bag because the bow is larger. 
I'm really loving the way these turned out! 


As always, thanks for stopping by and have an amazing weekend. 

Wednesday, January 6, 2016

Valentine Goodie Bags with Apryl

With Christmas and New Year's come and gone, what's the next holiday that's fun to do some crafting for?  Valentine's Day!  It's one of my favorites, and the kids love it also!  Apryl with SVG Attic Guest Design Team here today to share a couple of cute goodie bags using SVG Attic's Basic Gift Bag CollectionJGW Tropical Haven Collection and an assortment of Bella Blvd.  and Heidi Swapp papers.


I like using bright colors and fun patterns together and that is why I chose the flip flop and pineapple to adorn the valentine goodie bags.  The bags I made here are the short and tall handled gift bags.  


The flip flop is from the flip flop standing album file.  I used the flip flop that goes to the front of the album.  This is a two piece flip flop:  the base and the top with slits in it.  For it to fit the gift bag, I resized the flip flip to 5.8" tall and 3.4" wide.  Layered the top shape with the slits in it and sized it so it fits just inside the base.  I also had to resize the other pieces proportionately.  This is easy to do once you have the flip flop resized.  


The pineapple on the short gift bag is from the Pineapple Sweet Card DS file.  I also resized the pineapple to fit the bag.  The base is 5.4" tall by 3.5" wide and I adjusted the layers proportionately.  I added the glasses from the Tropical cool box file.  I hand cut the hearts out of patterned paper and fit them behind the glasses.  I thought the pineapple came out really cute!  He could definitely be my valentine!  

Hope you enjoyed this fun little project and it inspires you to create your own.

Have a fabulous day,

Apryl Holland


Supplies Used:

Bella Blvd. Molly Collection:  Unlimited Text,  Sketch w/ Style, Peace, Sparkle & Shine
Bella Blvd. Summer Squeeze:  Strawberry Squeeze
Bella Blvd. Sprinkles: Bell Pepper
Bella Blvd. Luckystarz: Peep Starz
Bella Blvd. Family Forever:  Language of Love
Heidi Swapp Marquee Love Paper Pad:  Pink & Teal glitter paper

Black Card stock, Brown Card stock
Stickles:  Xmas Red, Black Diamond, Dark Green
Antique Brass brad
Twinery Twine:  Pink, Teal


Monday, January 4, 2016

Jesus & Coffee

Good Morning! I hope you all had a very Merry Christmas and a Happy New Year! Tanya from Crafting on Caffeine here. I decided to do something a bit different so I did an etched glass cutting board.  I used the SVG Attic File "JGW All I Need" 


I found this glass cutting board at Target and then I took the file and Mirror Imaged it. Then I weeded the negative and placed it on the underside of the board. I applied my Etching Cream and let it sit for an hour. Then I washed it off and Ta-Da!


I hope this gives you some inspiration! Stop by again soon! Thanks!