Pages

Wednesday, October 31, 2018

Witches Guide

Hello all and Happy Halloween. Sonja with Sugar Bean Cards here with my latest SVG Attic project!

I've done the Casket and the Cauldron with a Skull in it, so keeping with Halloween I decided to do a witches set. I used three SVG Attic/SnapDragon Snippet files for this set.

The Witch Hat Bow Rocker Card, Witch Double Diamond Fold Card, and Witches Broom all make up this set.


Have a safe and fun Halloween!

Materials Used: 


FTC disclaimer: I received some of these products for free but was not compensated for writing this post. To view my complete disclaimer, click here.


Tuesday, October 30, 2018

Warning: Not for the faint of heart!

My last Halloween post - this year. Going out with a bang or maybe a kill….so to speak!

Ever since the Spring when SVG Attic released the Make a Splash kit, I knew what I wanted to do with the 3D Bath Tub.

Knowing my evil, crooked mind, you would too….MUAHAHAHAHA

Halloween of course - but what does a bath tub have to do with Halloween?

Setting the scene: A woman is taking a long hot bath in the tub/shower and is not seeing the figure coming into the room with a knife in the hand - Next thing….she is being stabbed to death and blood spills all over the tub and shower curtain.

Recognize this scene???? 

Yes it's the famous shower scene from the movie Psycho - only a little more graphic since it's in color.

I really had fun making this and it did take me a while as I had to figure out how to make the shower curtain.

Using my scout-day skills (LOL) I tied some hibachi skewers onto a metal ring and covered it all with black flourist tape.

Then I added the curtain which is made from vellum and folded here and there to give the impression of a hanging curtain.
The Tub is made from AC Cardstock in Ash and with patterned paper from DCWV's Spooky and Sparkly collection. I also used Silhouette Printable Silver Foil for the faucets. I created the top shower head myself out of the bottom faucet and some circles I stacked together.
I then painted the inside of the tub to make it all white and a tiny bit shiny. Once that was dry, I went to town with the blood splatter - using a brush and some red paint. The bloody handprint on the curtain is made from red vinyl.
The shower mat and the knife are both from the Silhouette Design Store (Knife: Design ID #116580 by Studio Ilustrado and Mat: Design ID #1565 by Silhouette)
I know this isn't for the faint of heart, but it was so much fun for me to make and to able to actually create an idea that just pops into my head, is fantastic.


I do hope you've enjoyed this bloody project and all the other Halloween projects I've made throughout the month. Thank you so much for joining me and my vivid imagination.


Now it's time to turn my attention towards something else.


New to SVG Attic?  Check out these awesome places!


Sunday, October 28, 2018

Haunted Funeral Coach

Hello, Happy Sunday and welcome back - so glad you're joining me today.

The month of Halloween is almost at an end - Halloween is this Wednesday :-O Not much time to get those last projects done for the big day!

I just had to make this totally awesome Coffin 3D Coach Model that Jodi made. It's out of this world fantastic!
It's made from AC Cardstock in Charcoal, Plum, Caramel and Black.

I used the Rig O Mortise Funerals Vinyl Sign on both side windows. I cut them in frosted vinyl and transferred them onto the acetate with some tape.

All edges are inked with Distress ink in matching colors.

I also made the Coffin 3D Box but I played a bit with it.
I cut the "RIP" into both the box and the panel and backed it with acetate. I also cut small holes along the sides of the coffin, so light from a small LED light can shine through - giving it a spooky look.

The coffin is made from AC Cardstock in Chestnut along with patterned paper from Simple Stories.

I used most of a weekend to find the Coachman/Undertaker. I simply couldn't find a sitting skeleton anywhere. So I made him myself by breaking his legs at the hip and knees and glued them on again with hot glue - rather morbid.
The coffin fits perfectly inside the Coach and looks very spooky at night with the green light oozing out of the holes.
It would also be awesome as a table centerpiece for your Halloween party - filled with treats and the coffin is also perfect for yucky Halloween candies.
I hope you've enjoyed the Coach - please let me know in a comment below and please join me again one last time before the BIG day!

New to SVG Attic?  Check out these awesome places!


Friday, October 26, 2018

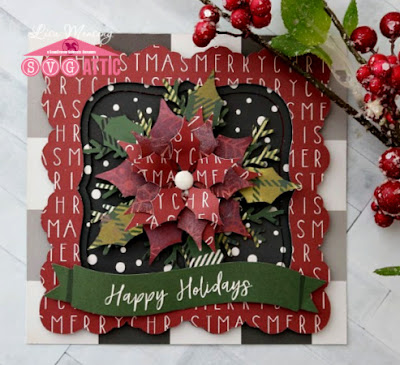
Happy Holiday Poinsettias


Hello and welcome back, everyone! Lisa here from The Relativity of Paper.  Can you believe we are five days away from November? I decided to get a head start on Christmas starting with a card and gift box featuring these beautiful poinsettias from the JGW Poinsettia Passion Kit! I have to say that I love the poinsettias from this particular collection, they're easy to cut and assemble. I borrowed the box from the JGW Gone Fishing Kit.


You can find easy to follow tutorials on the Needles 'n' Knowledge Blog: Poinsettia Doily Frame Card and the Trout Jumping Gift Card Box


The card is a 6 x 6 card which is perfect for showing off that gorgeous poinsettia. I added Distress Oxide Ink to the flower petals in the color Aged Mahogany and Distress Oxide Ink in the color Forest Moss to the leaves. 


The box is 5 x 5 x 1.5 with a gift card insert and there's extra space underneath to add candy. This would be perfect for a co-worker who loves candles. A gift card to a candle shop and a small pack of votives. I assembled the box in less than 10 minutes, it's super simple. And I like to remind everyone about my favorite tip of using binder clips while assembling projects. It truly keeps your hands free and that keeps things moving along. 

The paper is My Mind's Eye -  Winterberry. It's so beautiful, I love the colors. I finished the center of the poinsettia with a Winterberry Enamel dot. 


As always, thanks for joining us! 
New to SVG Attic? Check out these awesome places!
SnapDragon Snippets 


Thursday, October 25, 2018

Ghostly Candle Sticks

Hello - yes it's me again.

Just popping in to show you these awesome new Candle Sticks/Candle Stands 3D for Display that just recently released in the SVG Attic store.

I made all three sizes and they are very easy to make. Only took me an afternoon to make these and just look how cool they came out:

They are all made with just Black AC Cardstock and inked with Ingvild Bolme White Chalk Ink.

I decorated them with some bows made from Ideaology's Mummy Cloth and added some acrylic balls in which I added some spooky images made from Printable Acetate.

A tribute to my all time favorite series - Supernatural:
A spooky Skull:
...and a spooky eyeball:
I got the idea for the balls from a craft video I saw on Facebook and thought that they would work wonderfully on the displays.

Thank you for joining me for my little blog post today - I'll soon return with more spookiness.


Wednesday, October 24, 2018

Last Minute Treats


Halloween is in one week from today. Tracy here from the Idea Closet.  If you  feel like you are running out of time, and still need  treats for your special ghosts (and who doesn't) I have some simple yet cute last minute ideas for you using files from SVG Attic.


This pouch is so easy to do, and when you let cute paper do the work its quick too.
The file is the Bath Salt Envelope from the Make a Splash Kit.
I used the 4x6 journal card for the front and added a tag from the sticker collection.  
The paper is from Doodlebug.


Another fun and simple treat box is the Jack-o-Lantern Box Set.
There are several different face options, allowing for individual boxes for your friends.


Its easy to change the size on the box as well.  To make it larger I set the setting at 125% in the silhouette software or you can just resize it in your software.

I hope you all have a fun and safe Halloween!

Monday, October 22, 2018

Batty Treat Holder with Beth

Hello everyone!  Beth from Beth's Beauties here with you today.  I created this fun Halloween treat holder to share with you. 
The file I used to create it is the Bat Handle Candy Bar Tote.  It is quite simple to assemble, but if you get stuck, Jodi has a great tutorial for it HERE.  The paper I used to create it are from DCWV's Spooky Halloween stack.
This holds 6 fun or mini sized candy bars, three in front and three in back.  As you can see, I did a mixture of those sizes.  I embellished with Lime Licorice Trendy Twine and GMD Citrus Twist enamel dots.  Now this is ready to give to someone special for Halloween!
I hope you have a wonderfully crafty day!

New to SVG Attic? Check out these awesome places!

Sunday, October 21, 2018

Too cute to spook

Helle's back! Halloween is my month and I'm about to show you something that I normally do not make - cute Halloween!

I just couldn't help myself - Jodi didn't make it easy for me….ha ha

Just look at this adorable Ghost 3D Cubic Luminary. Isn't it just the cutest?
I chose to make faces for the light to shine through on all 4 sides. There are 3 options that comes with the file but I took one of them and just turned the mouth around and voila - a 4th option.

The Lantern is made from Vanilla AC Cardstock and the faces are backed with golden Vellum.

I inked all edges with a light brown Distress Ink and made the handle with some gold wire from my stash.

Finally I tied some ribbons onto the handle as a final touch. 

But I didn't finish with this one - I had to make the cute Cat 3D Head Model with Rosette (left out the Rosette) on top of the Box 3D Ten Sided with Lid Doily.

We are cat lovers in our house with three fur babies and this one actually kind of looks like Quark - our huge grey Maine Coon.

It's made from AC Cardstock in Black, Apricot, Key Lime and White along with Bazzill Bling Cardstock in a dark grey and patterned paper from Tim Holtz.

I left out the tongue and wanted to make some fangs to make him look a bit more spooky, but it didn't work out so I left him like this. Looks like our lazy cat.

I used some black and white twine as whiskers and tied raffia around the neck with a bow.

Aren't they both cute. Just the thing for the kids

Thanks for joining me today - I'll be back soon!

New to SVG Attic? Check out these awesome places!

Friday, October 19, 2018

Jingle All The Way ~ with Cyndy G

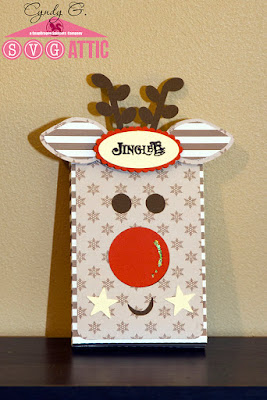
Happy Friday.  Today I am sharing a project using files from SVG Attic.  I know I have been doing a lot of Christmas already but I have a large family and in order for me to get everything done that I would like I have to start this early.  Today I've got a super cute treat box, the Reindeer Candy Cane Box.  This box is so cute and very easy.  This is what I am going to let me kids make for their classmates this year.

I decided I wanted my box to be for candy without the candy canes.  The optional file is included with your download.

Treat box with reindeer face


I used Authentique Frosty Winter collection.  I just love the patterned paper, such an easy way to change the look and add a little personality to your project.  Thank you for stopping by have a happy crafty day.

New to SVG Attic?  Check out these awesome places!


Do what inspires you,
Cyndy G

Wednesday, October 17, 2018

A Little of This and That

Hello all. Sonja with Sugar Bean Cards here with my latest SVG Attic project!

I wanted to make a witches cauldron using the Pot of Gold file. But what was I going to put in it? I could've done some feet, legs, arms, bubbles, and then I remembered the 3D Skull file.


I decided for my color pallet to play off of my last post: Knock, Knock, Knocking.
I dry brushed some brown, gray, and green ink onto the skull before assembly to give it the aged look.
I hollowed out the eyes, ears, and nose to place vellum over the holes.
Turn the lights on... 

The cauldron got lost in the black backdrop, so here's what it looks like.


Materials Used: 

  • Die Cut Machine
    • Silhouette Cameo 3
    • Silhouette Studio-Designer Edition
  • Adhesive
    • Aleene's Original Tacky Glue
  • SnapDragon/SVG Attic file ~Pot of Gold 3D Skull

FTC disclaimer: I received some of these products for free but was not compensated for writing this post. To view my complete disclaimer, click here.