Pages

Monday, December 31, 2018

Shaped Snowman Card with Beth

Good morning to all my crafty friends!  Beth from Beth's Beauties here today.  I have some thank you cards to send out after the holiday season, so this is one of those cards that I will be mailing.  The card file is from SVG Attic's Winter Illuminations kit.
This card was very easy to assemble!  I opted to use the front panel without the stitching holes.  I used patterned papers from DCWV's Blue Noel stack and a ribbon for the scarf.  Adhesives used include Scotch Tacky Glue and Glue Dots Glue Lines (for the ribbon).  I also stamped a sentiment from APB Let It Snow stamp set in black in the lower left corner.

I hope you have a wonderfully crafty day!

New to SVG Attic? Check out these awesome places!

Friday, December 28, 2018

Candle Heart Cutout ~ with Cyndy G

Hello Cyndy from Cyndy G Time Made For Me.  Today I am sharing a project from SVG Attic.  The Candle Heart Cutout 3D Boxes.  These boxes are so cute and not too hard to put together.  Instead of doing mine in the Valentine theme I used winter paper. 

3d Candle with heart shaped cutout

I also added the slice form snow flake from the SDS Ornament Kit.  The snowflake is 2" tall.  Since I made it so small I only cut three snowflakes for the center.  

3d Candle with heart shaped cutout

I used a forth snowflake as an accent on the tall candle and tied some Chocolate Sprinkles Trendy Bakers Twine around the candles.  The lights are just the short tea lights or if you have them you could use a tea light that has the look of a melted candle.  

New to SVG Attic?  Check out these awesome places!


Do what inspires you,
Cyndy G

Wednesday, December 26, 2018

Celebrate

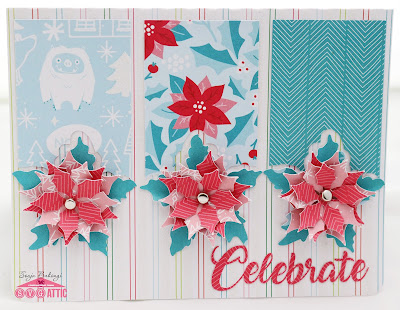
Hello all. Sonja with Sugar Bean Cards here with my latest project. I combined three SVG Attic files into this little gift set.

I took one of the Basic Gift Bags SVG Collection, the Poinsettia Trio a6 Card, and the poinsettia from the Poinsettia Doily Frame Card to mix all three files with the newest Happy Wishes DCWV stack.

This poinsettia is my favorite one in the whole store so I had to use it on the bag and switch it out on the card front as well.


Materials Used: 


FTC disclaimer: I received some of these products for free but was not compensated for writing this post. To view my complete disclaimer, click here.


Sunday, December 23, 2018

Good Night Santa

As I promised, here is my last Christmas post this year and I need to do this a little quick, because I need to finish making tomorrow's dessert today.

Ok....I made one of the older files this time, namely Santa's Arm Chair Box from the JGW Santas Repose kit:


I simply couldn't shake the vision of Santa coming home after a busy night delivering presents and being exhausted, just wanting some quiet time in his chair in front of the fireplace.

The chair is made from AC Cardstock in Pomegranate, Cranberry and Vanilla along with several pieces of patterned paper from "St. Nicholas" by Graphic45 and two shades of green Pearl paper.

I used two ball chains to hang the Santa sign onto the chair.

I wanted to make a footstool too but ran out of time - but I imagined making one with the Candle 3D Stand 3 Inch Pillar just downsized and maybe altered a bit - oh well some other time.


Santa's hat is from the Santa Clause 3D Canister in the JGW Winter Friends Canister kit and the stocking I snatched from the Stocking Trio A6 Card that I found in the Silhouette Design Store design ID #88698. I just added some Stickles Burgundy glitter glue to the top and bottom for a little extra detail.


They are made from AC Cardstock in Vanilla and various patterned papers from the "St. Nicholas" Collection.


There….I kept it short for once ha ha. Now it's dessert making time and then onto wrapping the last gifts - then I'm all set for celebrating Christmas tomorrow night (we do the whole eating and gift giving on the eve of the 24th. here in Denmark)

Happy Holidays to all of you - whatever you're celebrating and I hope you'll have wonderful couple of days of rest, relaxation and maybe…..just maybe….a little time to sneak of and craft a little.

New to SVG Attic? Check out these awesome places!


Friday, December 21, 2018

Wrapping Up Christmas


Happy Friday! 


Today, I'm sharing a few last minute Christmas projects. 

My first project was to update three stockings I have hanging in my dining room.


Using the Evergreen Round Tag and PhotoPlay Patterned Paper I made stocking tags with our initials.


I used a small dot of hot glue under the white fur trim to hold the tags in place. 
A super simple and easy way to dress up those stockings.


I needed a last minute card and who doesn't this time of year?

I used the card from the JGW Patchwork Christmas Set. 
Here's a tip: the 12 x 12 papers that have squares with designs are perfect for this card.  I used kraft paper and PhotoPlay patterned paper to create the card. 


Thanks for stopping by! 

As always, thanks for joining us! 
New to SVG Attic? Check out these awesome places!
SnapDragon Snippets 


Wednesday, December 19, 2018

Pillow Boxes Make Great Gifts


Tracy here from the Idea Closet and today I am sharing a new project for SVG Attic.

I don't know about you, but I feel like the last couple of weeks have flown by!
My to do list didn't get done and now its time to finish up all the projects that were started.

These little Pillow Boxes are perfect for last minute gift ideas.  
There isn't many pieces and they go together quickly.  
You could even have an older child help you.


Reindeer Pillow box


and Santa Pillow Box.

The boxes were so cute, I really didn't change them up at all.

I did add the label from the reindeer box to the Santa box and tied both of them with some twine.

Filled with some candy or gift cards, they will make great little gifts. 
In fact, I think I will make a few more to have on hand for those  "just in case" moments.

Both files can be purchased separately or as part of the 

Thank you for joining me today!

Monday, December 17, 2018

Christmas Hair Bow with Beth

Good morning to all my crafty friends!  Today is my day to post on the SVG Attic blog.  This is a very busy time of the year for me, as it is for many of you, I am sure!  The project I am sharing today is a little different than usual.  It is a Christmas bow made out of felt for my baby girl!
I started out by picking the colors of felt that I wanted to make the bow out of.  The glitter gold is not actually felt, but is found by the felt in my craft store.  It worked well in the same way as the felt did for my project.
Next, I cut pieces of the Bow 3D Lattice 2 Layer file (is also part of the Decorated Large Tote Gable Box file) out of Reynolds Freezer Paper.  The parts of the file that I used were the solid bow and the straight tails.  I also broke apart those pieces in my software and deleted the holes that were in the original files so I was left with the following pieces:
The measurements for the pieces above were (top to bottom) 5.25" wide, 4.5" wide, 3.75" wide, and 2.75" wide.  The next step was to iron the freezer paper shiny side DOWN onto the back side of the felt.  Use medium low heat on your iron (or a polyester setting) and use a thin pressing cloth.  You know it is heated enough when the freezer paper sticks to the felt.
Here are all of the pieces ironed onto the felt.
Next, using a scissors, cut around the freezer paper templates.  Gently peel the freezer paper off of the felt.  Your pieces will look like this:
Using a hot glue gun, add a dot of glue to the center of the bow, fold in one end, then repeat for the other side of the bow.  Assemble each bow piece the same way, then use hot glue to build the bow from the bottom up, starting with the tail piece, then largest to smallest bow piece.  I tied a piece of gold ribbon around the assembled bow and added a Christmas button to finish it off.
Here it is on my little sweetheart!  Now she is ready for Christmas!
I hope you have a wonderfully crafty day!

New to SVG Attic? Check out these awesome places!

Sunday, December 16, 2018

Christmas Time

Hello - Helle from www.mycreativehideout.com has seized control of the blog this fine 3. Sunday in Advent.

I want to show you what I've been up to this past week. It involves these:


I fell in love with them instantly and knew exactly what I wanted to used them for.

Christmas Tags for this years presents!

I used the Tag Thanks Latte and stripped away everything but the scalloped base and the inside circle.


I didn't feel like making a very detailed tag because I felt the dome, the glitter and the small image inside the dome was details enough.

I used DCWV "Christmas Plaid" paper and Tim Holtz Ideaology Gold Kraft-Stock for the tag.

Inside the dome is a print and cut motive of pinecones with branches from Carta Bella's "Let it Snow" collection along with Diamond Sugar Dust from Craft Décor.

I embossed and sanded the gold paper for effect and used gold twine to tie it unto the presents.


And I didn't stop here…..

I was on a roll with these domes and decided to use them for this years place cards for the Christmas Table:


The place cards are the JGW Snowflake Placecards.

They are made from Kraft Cardstock, Ideaology Gold Paper, white pearl paper and Best Creation White Glitter Paper.

Inside the dome is a print and cut from Carta Bella's "Christmas Delivery" collection and Diamond Sugar Dust from Craft Décor. I also wrote "Merry Christmas" in Danish.


Instead of using a candy inside the tag, I used snowflake printed vellum to write the names and decorated with a border of a snowflake circle (design ID #34350) I found in the Silhouette Design Store.

Then, for a fun detail, I placed a small led light inside the tag:


It's a bit hard to see in the picture, but it really lights up the name nicely.

As a final detail, I tied some gold tinsel on top of the place card.

And there….I'm all set for Christmas now.

Thanks for joining me today. I'm back again next Sunday for a final Christmas project.

New to SVG Attic? Check out these awesome places!


Friday, December 14, 2018

Nutcracker ~ with Cyndy G


Hello crafters.  This is my favorite time of year.  I love all the Christmas decorations and children’s Christmas programs.  We recently saw my niece perform in the Nutcracker.  It is such a sweet story with all the scenes that make you think of Christmas.  It made me thnik of the Nutcracker boxcard from the CG Nutcracker Dream. 

Nutcracker box card

Nutcracker box card

I just love this card.  I did mine in soft colors but I know it would look amazing in rich reds and greens.  I added a button clock face to my clock and several other small details to my tree and front banner.  

Nutcracker box card

What a wonderful card to give to a child or adult who had performed in the Nutcracker!  Thank you for stopping by.

New to SVG Attic?  Check out these awesome places!


Do what inspires you,
Cyndy G

Thursday, December 13, 2018

Christmas Truck

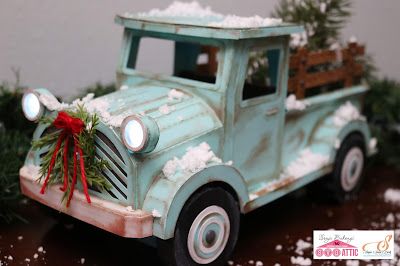
Hello all. Sonja with Sugar Bean Cards here with my latest project. I have been anxious to make this new 3D Classic Model Truck file. I just needed the time to make it. Well this is probably a first in the history of me being on the SVG Attic Inspiration Team for years, where I had to ask for an extension because I needed more time and didn't want to rush this.

Note, there are additions I made to this file that ARE NOT included in this file. They are personal additions so please don't expect to find it when you purchase said file!

After I cut out all my main pieces in Bazzill Cardstock's 'Robin Egg', I aged it with Tim Holtz Walnut Stain Distress Ink as well as some Teresa Collins Fiesty Red Pigment Ink.
 I decided my truck needed a seat. This is one of those additions that does not come with this file.
Even though I used a heavier cardstock, I still like to use my Teresa Collins Mega Runner by Xyron® to adhere the pieces to prevent warping.
For the smaller pieces, I used my 1.5" Sticker Maker from Xyron. 
The wood pieces I felt needed to be embossed using a We R' Memory Keepers wood grain embossing folder and my Sizzix Big Shot.
I also added the wood slats to the bed of the truck. I used a silver gel pen to color in the added 'screw holes'.
I took the same Walnut Stain ink and distressed the wood grain after embossing it. 
At this point, (the end of day 1, took me 3 days to do this much detailing) I was looking at the grill and thought you know what, I want those lights to sparkle. So I set out to customize my grill. 
At the end of day 2 I was so close, yet so far away. 
Day 3 I decided I needed to reinforce the bottom carriage with more cardstock simply because the battery pack I have in the cab was a bit too heavy for the carriage to handle.
At the end of day 3 I was running out of steam. I was going to cut a tree and wreath out in paper, but then I found these sprigs of greenery in a box downstairs. So I compromised and made what I could out of them!
Now, you cannot have a Christmas Truck without snow. And wouldn't you know that all THREE stores I went to were all out of the fake snow tex snow.
Pinterest to the rescue. I made my own fake snow with 1 1/2 cups baking soda, glitter, and 1/4 cup white hair conditioner. Glitter is optional, but not in this house. Especially with the husband standing there watching me make this. I added in more just for his benefit.

Final Project:


Yes, the lights are real light up lights. This is an addition, NOT included with this file!


 I had the best smelling snow this side of the Mississippi for sure.

 I made the trees removable so the detail of the bed can be seen.


 Even the running boards are wood engrained.

Phew now that was a task! Thank you so much for joining me today.


Materials Used: 

  • Paper:
    • Kraft brown for wood
    • Bazzill Cardstock
      • Robin Egg
      • Waxy Lips
      • Peanut Fudge
      • Fig Swirl
  • Die Cut Machine
    • Silhouette Cameo 3
    • Silhouette Studio-Designer Edition
  • Adhesive
  • SnapDragon/SVG Attic file ~Truck 3D Classic Model
    • Extras
      • Teresa Collins Fiesty Red ColorBox Pigment Ink
      • Tim Holtz Distress Ink Walnut Stain
      • Sizzix Big Shot
      • We R Memory Keeper wood embossing folder
      • AC Elements Brads


FTC disclaimer: I received some of these products for free but was not compensated for writing this post. To view my complete disclaimer, click here.