Pages

Friday, March 30, 2018

Easter Treats with Lisa


Hi and welcome, everyone! Can you believe we are already peeking into April? I needed last minute Easter goodies for the family. Did I mention the family wasn't supposed to be getting together this year? Well, they weren't and that brings us here, me sharing last minute treat bags and a basket of goodies. The Easter Basket was already done but I figured I would share everything since I did take the time to make it. Oh, and let me mention, everyone in my family thinks they are too old for cutesy Easter fun so I decided to do "grown-up" treat bags for everyone. (Some days I can't roll my eyes hard enough at these people I call family!) 


Using SDS Carrots Mini Treat Basket that I found in Silhouette Design Store. I ran the cut-out pieces through my BigKick with a basket weave embossing folder to add a little texture and add Distress Oxide Ink in the color Walnut Stain. I'm telling you this is the easiest basket to create. It does come with a really cute mini carrot to decorate but I left simple. 


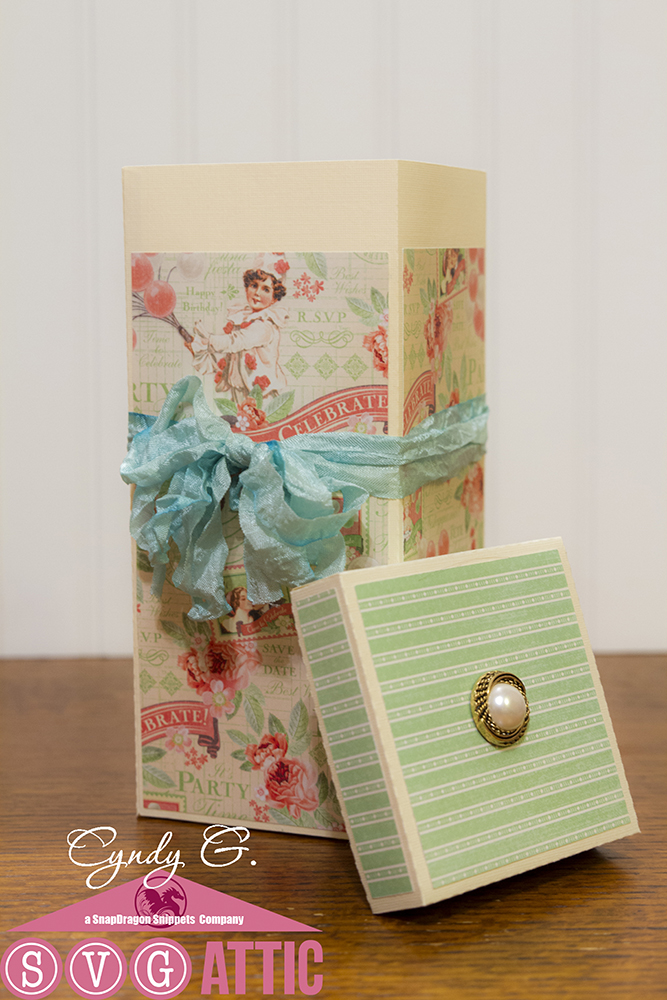
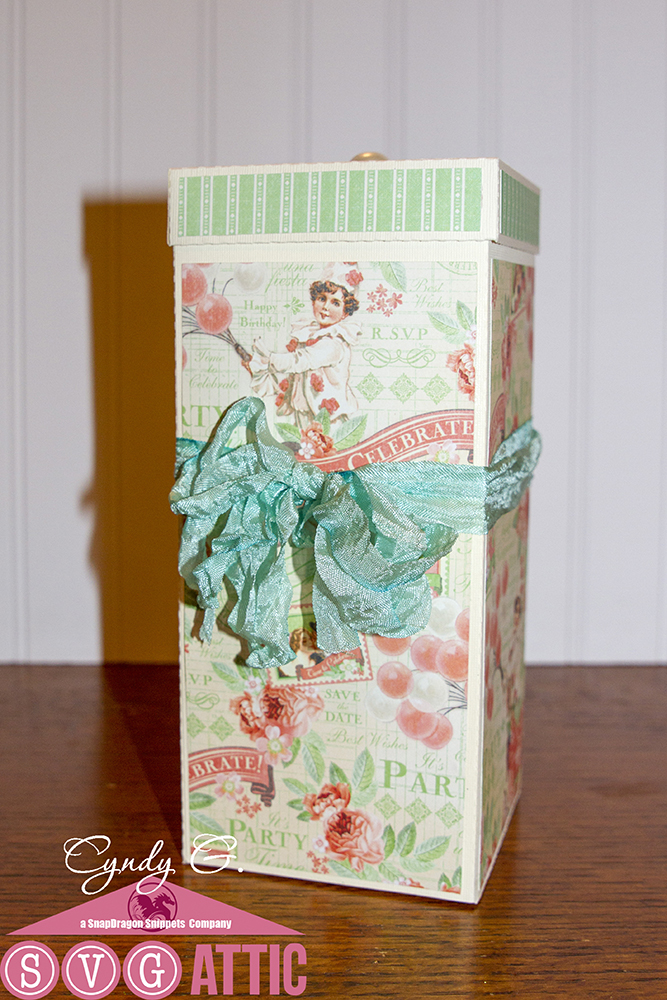
For the ladies in my family, I used pretty floral papers from my stash to create these fun treat bags using the Apple Treat Tote from the SDS Store and filled them with a few pieces of yummy chocolates.  This is my go-to treat bag because it's so easy to create. 


Just by changing the paper to a masculine paper I created bags for the guys, too. 


Wednesday, March 28, 2018

Easter Lilies Box Card


We are 3 days to Easter and if you want to make a few more projects you might feel like you are running out of time.
Tracy here and today is my turn for the SVG Attic blog and I have a beautiful box card.

Even though there is lots of details, its still fairly simple to put together.

The details on the lilies are beautiful and easy to layer.


If you are looking for a great project check out the
Lilies Bouquet 3D box card at Snap Dragon Snippets or in the Silhouette Store, 
then follow Jodi's instructions to cut and assemble the card. 

Thank you for joining me today and Happy Easter!

Monday, March 26, 2018

Easter Blessings Card with Beth

Happy Monday morning!  Beth from Beth's Beauties here with you today with this beautiful Easter card.  I needed to create one more to send out to family, and this one was perfect!
 I used the Easter Blessings A6 Card file from SnapDragon Snippets.  I really didn't alter anything from the original design.  The papers I used are from DCWV's Romantic Life stack and Brights Adhesive mat stack as well as scrap papers.
I kept the card simple, only embellishing with Platinum Stickles on the lily stamens and Viva Pearl Pen in Ice White on the word Easter.  The finishing touch was a bow of white seam binding.
I hope you have a wonderfully crafty day!

New to SVG Attic? Check out these awesome places!

Friday, March 23, 2018

Gift Box ~ with Cyndy G.

Hello, today I am sharing a pretty box from SVG Attic/Snapdragon.  It is the Tall Box with Lid.  This is a very nice size and it is easy to put together.  It makes a perfect gift box.  You could decorate it for an occasion.  I have used Graphic 45 - Time to Celebrate because I am going to use mine for a birthday.


I used some crinkle ribbon around the box and a button as the accent on top.  You could also use a large bead or a draw pull.  I just love this ribbon!


The box stands just over 9" tall and is 4" square.  Thank you for stopping by.

New to SVG Attic?  Check out these awesome places!


Do what inspires you,
Cyndy G

Wednesday, March 21, 2018

Happy Easter

FTC disclaimer: I received some of these products for free but was not compensated for writing this post. To view my complete disclaimer, click here

Hello all! I-team member Sonja here with an Easter bunny and pop up box card. It seems that spring is popping up, at least the flowers have begun to around here! With spring comes Easter. 

I decided to grab two SnapDragon Snippet files to help celebrate this holiday. 

Rather than go the traditional color route, I decided to grab my Blush Glam stack by Craft and Smith and do a soft pink and gold set.
Instead of making the bow a necktie for my bunny, I decided to make her a girl and give her a head bow instead.
 The pink, tail. Love it!
I switched out the files eyes for wiggly ones just for a little fun on both the card and 3D bunny.

I continued with the same 'girl' theme with the pop up box
I changed out the sentiment in the file for a 'Happy Easter' and 3 small eggs sentiment.

Materials Used: 

  • Bazzill Papers
    • (1) Juicy Pear
    • (1) Easter Grass
    • (1) Flintstone
  • Craft Smith 12" x 12" stack
    • Blush Glam
  • SnapDragon Snippets
  • Silhouette Cameo 3
  • Silhouette Studio-Designer Edition

FTC disclaimer: I received some of these products for free but was not compensated for writing this post. To view my complete disclaimer, click here

Monday, March 19, 2018

Bunny Bi-Fold card

Happy Monday! Tanya here from Crafting on Caffeine. Now that we are coming up to the Easter season I thought I would create a bunny card. So I went searching SnapDragon Snippet. And found the bunny bi-fold a6 card


I changed up the colors and added texture by using my Diamond press and small embossing folders.
The paper used is all DoodleBug Designs
I added a bow using Trendy Twine.

Hope you enjoy!

Sunday, March 18, 2018

Hello Spring

Hello to Spring.....Hello to you and Happy Sunday!

Today I want to show some Easter and Spring projects that I made this last week. Who isn't dying to get out all their Easter and Spring decor right about now and start decorating? I know I'm soooo ready for Spring and Easter always marks the transition from Winter to Spring for me. So I've been busy creating.

First of I want to show the cute Spring Wreath from SnapDragon Snippets that I made using the Flat 3D Daisy instead of the original flower - just to make it more dimensional.

 
I used AC Cardstock in Lollypop, Cotton Candy, Grass, Oregano, Melon and Sunflower and inked all the edges with Prima Ingvild Bloome Chalk ink pads. Then I used a black Sharpie to draw the small dot on the centers of the flowers. Finally I tied a pink dottet ribbon on top and that's it. Very very easy to make - and it's so Spring-y.


Next I made the small and adorable 3D Chick Box that I found in the Silhouette Design Store (it is a SVG Attic file though)


Isn't he cute?
 
I used AC Cardstock in Canary, Dandelion, Caramel, Chocolate and Black and for the wings I used Bazzill Swiss Dot Cardstock in a light yellow.
 
I inked all the edges with Ingvild Bloome Chalk ink pads and mounted the wings with yellow heart shaped eyelets. Finally I dotted the little eye with a white Sharpie.
 
Love this little fellow to bits - and it's a box that you can put treats in!
 
Last but not least I made an Easter Card


This adorable and fun card is the Bunny Shaker Window Card from SnapDragon Snippets (also available in the Silhouette Design Store Design ID #189097)
 
 
For this baby I used AC Cardstock in White, Black, Carrot, Sunflower, Grass, Oregano and Peony and inked all the edges with Ingvild Bloome Chalk Ink Pads. I used a piece of Acetate from Crafter's Companion as window and filled it with Skittles. Now who wouldn't love to get a card like this one?
 
 
And there you have it - the Easter/Spring projects I've been fiddling with this last week and believe me - I ain't done yet!
 
Thanks for joining me today - hope to see lots of Easter and Spring crafting goodies from you guys!
 
 
 New to SVG Attic? Check out these awesome places!


Friday, March 16, 2018

Rosette Cards with Lisa


Hi and welcome, everyone! Lisa, from The Relativity of Paper, taking over the blog today with a few cards featuring these beautiful Rosette A7 cards.  I started out making one and decided I had to make another card featuring this very unique rosette


 For the Easter card, I used the rosette, label, and banner from this file
I cut the rosette using Authentique 12 x 12 Micro Basics, the label and banner are cut from #110 Neenah cardstock, the Egg is cut from Doodlebug Paper. I used the negative from the egg cutout to add Distress Oxide Wilted Violet to the label to layer the egg over. Finished off with sentiment and a few gems. The egg can be found in the Silhouette Design Store under Snapdragon Snippets - 9 Easter Eggs. All this is layered on an A2 card base. The purple mat is Doodlebug Paper cut to size.


This is the card that started this well, actually, I've been dying to use this paper, MME In Bloom Kit, for a while now and I knew it would pair perfectly with this elegant Rosette Card.


This is the actual A7 card base that is included in the file cut from #110 Neenah Cardstock, matted with MME In Bloom, the labels are black cardstock and MME In Bloom, the rosette was cut from the MME In Bloom along with the circles atop the rosette. I finished it off with a sticker from the kit and black enamel dots.


I hope you'll give these cards a try. I think you will be surprised how easy they come together. 
As always, thanks for joining us. 


Thursday, March 15, 2018

Bunny Garden

Hello - so glad you want to join me today.
 
I'm sneaking in to show you a "little" project I made this week. You know when the idea hits, you just gotta go with it - so I did.
 
I've set my mind to changing up the Carrot 4 pnl 3d Box Fence from SnapDragon Snippets and I thought of changing the carrots to bunnies.

 
So I grabbed the nose and whiskers from the Bunny Shaker Window Card, the ears from the Bunny 3D Spheres Figure and the eyes from the Bunny Tummy Lip Balm Standing Card and started my project.


I made the Bunnies in White AC Cardstock with ears and nose in Cotton Candy and the eyes and whiskers in black pearl paper. I dotted the eyes and nose with a white Sharpie and inked the edges with a Ingvild Bloome Chalk Ink pad in Pastel Brown.
 
The ears are made as I would for the 3D Spheres Figure, but I cut the bottom of and glued it onto the top of the front segment, filled it with candy and then I closed the box by tying a ribbon around the top segments and made a bow. I did this for all three bunnies.


Then onto the box itself....
 
It's made from green Bazzill Swiss Dot cardstock and White AC Cardstock and all edges are inked with Ingvild Bloome Chalk Ink Pads in Pastel Brown and Garden Grass. Then all I had to do was follow the instructions from Jodi G. Warners tutorial.


Last but not least I added some Prima flowers onto the fence for that Spring feel.
 
Hope you like this "little" project as much as I do and thanks for joining me today.


New to SVG Attic?  Check out these awesome places!


Wednesday, March 14, 2018

St. Patrick's Day Gift Box


 St.Patrick's day is one of those over looked holidays but I think its a great time to show a little love to those special people in your life.

Tracy from the Idea Closet and for today's project at SVG Attic I made a little treat box using a valentine file,  Heart Ribbon Tied Candy Box, in combination with one of the St. Patrick's Ornaments, Kiss Me.


I resized both files to get a perfect fit. Then cut out the heart box with some pretty green cardstock.


I love all of the Ornaments...I think I have bought every set.
It make the perfect little tag.

Fill the box with some green kisses and tie it all closed with twine.
  
All the files can be found at Snap Dragon Snippets, SVG Attics, sister site. 
You still have time to make some little gifts to share this week.


Monday, March 12, 2018

Winter Fun Layout

Happy Monday!!! Tanya from Crafting on Caffeine here. I wanted to show you a layout using files that were intended for something totally different. I love how files are so versatile like that.


The following is a list of snowflakes I use for this layout:
You can find all at SnapDragon Snippets


I used DCWV Paper Pack for the snowflakes and background.


I used BoBunny Paper Pack for the title.


Other items I couldn't do without to put this together
ATG Gun
Xyron X
Lawn Fawn glue pen

Hope you enjoyed! Check back again soon for another new post!

Friday, March 9, 2018

Masquerade Box ~ with Cyndy G

Hello today I am sharing with you a beautiful box I made using files from SVG Attic/Snapdragon Snippets.  I used Hex Box with Lid and Masquerade Decorated 3d Mask.  I just love how it turned out.

Hexagon box with masquerade mask on top

I used Graphic 45 Midnight Masquerade Collection.  The colors are so rich and vibrant.
I shrunk the size of the mask so that it would fit on the top of the box.

Hexagon box with mask on top - box opened

I added jewels and pearls to the mask and some crystal ribbon around the top of the lid. 

Close up of mask

Thank you for stopping by.

New to SVG Attic?  Check out these awesome places!


Do what inspires you,
Cyndy G

Wednesday, March 7, 2018

St. Patty's Treat Boxes with Beth

Good Wednesday Morning!  Beth from Beth's Beauties here today with these fun St. Patty's treats!
I started with the SnapDragon Snippets Pot O Gold Candy Wrap svg file and used DCWV's Garden Charm and Adhesive Mat stacks to create it.  I filled a small zip top bag with chocolates and adhered it inside the wrap to show through the front.  The finishing touch was a bow of yellow ribbon.
I then created two Gold Coin Boxes using The Paper Studio's Watercolor Daydream double sided paper.  For the top decorative layer, I inked it with Wild Honey Distress Oxide ink and splattered it with water for an oxidized look.  I assembled these boxes with Scotch Tacky glue.
I hope you have a wonderfully crafty day!

New to SVG Attic? Check out these awesome places!

Monday, March 5, 2018

Luck & Love for St. Patrick's Day

FTC disclaimer: I received some of these products for free but was not compensated for writing this post. To view my complete disclaimer, click here

St. Patrick's Day is among us! Hello all, I-team member Sonja here with my latest post. Looking at the calendar, I decided to put some of my St. Patrick's day stamps to use. I received a bunch for free a few years back and this is my first time pulling one out. I know shame on me! 

After picking out the two files I wanted to do from SnapDragon Snippets website, I decided the perfect paper to go with these files would be some bright colors from Bazzill Papers. 

 For the card, I used (1) Juicy Pear, (1) Easter Grass, and (1) Flintstone
After cutting the shoe shape out with the Silhouette Cameo 3, I grabbed my Craftwell eBrush to float in some color.

Next I wanted some texture on my shoe so I ran it through my Sizzix Big Shot with a Darice swirl embossing folder.


For the tag, I changed out the sentiment that comes with the file so that I could use my stamp.
Below the photo shows the difference with the embossing powder once heat is started to be applied to the stamp.
 I decided to distress the edges of the tag just to break up the blank space on it.
 Final Projects:

  At the last minute, I decided this card needed a lucky treat bag to go with it!


Materials Used: 

  • Bazzill Papers
    • (2) Juicy Pear
    • (2) Easter Grass
    • (1) Flintstone
  • DCWV Glitzy Glitter
    • (1) Gold
  • SnapDragon Snippets
  • Silhouette Cameo 3
  • Silhouette Studio-Designer Edition
  • Sizzix Big Shot
  • Darice
    • Embossing folder
    • Heat Gun
  • Craftwell eBrush
  • Sharpie Marker
  • VersaMark Ink
  • Tim Holtz Vintage Photo ink 
FTC disclaimer: I received some of these products for free but was not compensated for writing this post. To view my complete disclaimer, click here