Pages

Wednesday, January 30, 2019

Valentine Flower Box and Card


Tracy here from the Idea Closet and today is my turn for another SVG Attic Project.  
Last time I used a Halloween Tote box and turned it into a Valentine Card box, Today I used another Halloween file.


The 10 sided 3D box is the base for the Cat Head.


To turn it into a Valentine box, I omitted the cat head and replaced it with the flower from the 


I also made a card to go with the box, using the Rose Trio card from the Pushing Petals collection.

Filled with candy, I think this would make a great gift for just about anyone.
Thank you for joining me today!

New to SVG Attic? Check out these awesome places!

Monday, January 28, 2019

Shaped Rose Card

Good morning to all my crafty friends!  Beth from Beth's Beauties here with you today.  I am starting on my Valentine's Day cards with this project.  The file I used is called Fancy Rose Stem Shaped Card from the Pushing Petals kit.  You can find a tutorial for the assembly HERE.
 I kept the file the original size and cut it out of papers from The Paper Studio's Country Road paper pad for the flower and solid cardstock for the rest of the cuts.  I added Glitter Pink Pearl Pen dots on the flower and inked all the cuts with brown chalk ink.
 I used the included "love you" sentiment, but there are several other banner sentiments to choose from on the SVG Attic website including "sweetheart", "God bless", "valentine", and "get well".  I wrapped some Pinkberry Sorbet Trendy Twine around the stem and tied it in a bow for a little more sweetness.
 The bud area opens on the back side to reveal an area for writing a note.  It is such a sweet card!
I hope you have a wonderfully crafty day!

New to SVG Attic? Check out these awesome places!

Wednesday, January 23, 2019

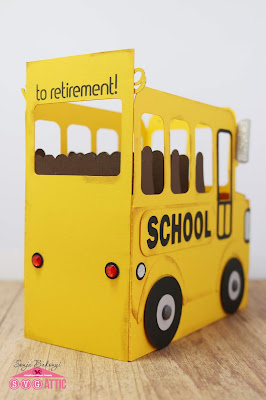
On Your Way to Retirement

Hello all. Sonja with Sugar Bean Cards here with my latest project. In 2017, I made a set of these cute Bus Box Cards for my son's bus drivers found in the JGW Back 2 School set.

Well one of his drivers called and asked if I could make a retirement card for a co-worker using that file. So I got to work...

I like to add personalizations to my cards like the recipients name or other requested details.
I decided to use the same color for all the bus yellow parts, but detail with a brush of ink here or there.
The back is left blank for a message
Lies down flat to fit into an envelope for delivery!

Materials Used: 

FTC disclaimer: I received some of these products for free but was not compensated for writing this post. To view my complete disclaimer, click here.

Sunday, January 20, 2019

3 X 3 = Hygge

What is "Hygge"?

Hygge is a Danish word for coziness - for snuggling under a blanket, being with friends or Family or maybe just being yourself watching your favorite series in candle light, cuddled up in a warm blanket.

Hygge is definitely what comes to my mind when I see candles - being real or LED - and that is exactly what I've been working on for the last week. Not just one but 3.

Not just candles - they have to have something to stand on, so I made 3 candlesticks too.

Not just candles and candlesticks - I added a ring of leaves - or should I say 3.

Enough yapping - here they are:


Candle 3D Chunky with Drips rests nicely on the Candle Stand 3D for Display with a alternated Candle Ring 3D Evergreens sandwiched between.

Let me start with the candle ring, as I made it somewhat different than the original.


It's made from AC Cardstock in Leaf and Kale.

I used my Silhouette software to remove the Evergreen sprigs from the ring and add Leafy Sprigs instead as I wanted a more Springy feel to the project. It's all about daring to use different features in the Silhouette Software (I bet lots of other cutting software offers features like this) like Make or Release "Compound path", Welding or editing Points. All in all just play around - you can't fail cause you can always go back.

Then I made the Candle in AC Cardstock Caramel and inked the edges with Distress Ink in a light brown shade. The candle sure is easy to make! You just have to have your pieces organized.


Finally I made the Candle Stand or Stick in AC Cardstock Vanilla and inked the edges with the same Distress Ink. This is also very easy to make and it is so sturdy!


That's it - times 3. Ready for Spring, Easter and Summer. You could add flowers to the rings for more decoration - I just like them the way they are.

Thanks for joining me today - please let me know what you think of this project in a comment below and have a super cozy Sunday.

New to SVG Attic? Check out these awesome places!


Friday, January 18, 2019

Love


Hi and welcome, everyone! 


Today I have another Valentine's Day card to share with you. I meant what I said in my last post about getting out in front of it. I'm Frankie Hecking it! I used the Cupid Hearts Teepee card. Don't be fooled, this card is super easy to make. I was very pleasantly surprised by the ease of it.  


To create the teepee card I started with Kraft and Red Coverstock to cut the base and accent elements.  I used white cardstock to cut the banner and the heart accent behind Cupid. I ran the red accents pieces through my BigKick in a heart embossing folder.


 I inked the accents pieces so the embossing would stand out a bit more. I added gold gilding flakes to the heart accent piece and inked the bare spots with pink ink. 


It's just a matter of assembling the card and adding final touches. I used 3D mounting foam behind Cupid, heart accent, and the scalloped round accent piece. Yep, it's that easy. 

Thanks for stopping by! 

As always, thanks for joining us! 
New to SVG Attic? Check out these awesome places!
SnapDragon Snippets 


Wednesday, January 16, 2019

Valentine Tote Box


Valentine's can be an exciting time for anyone, no matter their age.
Tracy from Idea Closet and today is my turn at the SVG Attic blog.  I thought it would be fun to make a Valentine's box for holding all your Valentine treasures.

For my project I used the Large Decorated Tote Gable Box.

This box was originally designed for Halloween and used Graphic 45 paper, however, I changed it up a bit and used paper from Photo Play to make a perfect Valentine's day box.


There is so much fun happening with this tote.


My favorite part of the box is the big 3D bow!


For the front of the box, I added a journal block, a tag with stickers from the collection and a bottle pop embellishment with paper from the kit; all tied with matching red twine.


To finish the box; on the back side I cut out a slot for cards to fit in.
Now it can be used at school or  home as a "mail box".

The Large Tote could be used in so many ways besides just Halloween!

Thank you for joining me today and I hope you  find time to create something beautiful this week.


Monday, January 14, 2019

New Glasses Ornament Card

Good morning to all my crafty friends!  Beth from Beth's Beauties here with you today.  I chose to make a card that has a detachable ornament for my sweet 3 year old niece who just got her first pair of glasses!  The file I used is the Sun Glasses Flowers Ornament.
I chose papers from DCWV's Glitzy Glitter and Girlhood stacks to make it bright and cheerful.  I sized the ornament to 4.125" wide so it would fit well on the front of my A2 card base.  I added a line of removable Glue Dots to the back so the ornament can be taken off the card and hung up or just simply played with :)  
The other products I used on this card include polka dot brads, ATG, Tacky Glue, Raspberry Cupcake Trendy Twine and a Pearl Pink Pearl Pen.  The finishing touch was stamping the date she got her glasses on the ornament.  I really hope she likes this card :)
I hope you have a wonderfully crafty day!

New to SVG Attic? Check out these awesome places!

Friday, January 11, 2019

Mr. Snowman ~ with Cyndy G

Good morning and happy Friday.  Cyndy here bringing you a project from SVG Attic.  I decided to make the Snowman 3D Ensemble.  Christmas may be over but as a lot of us know winter is still here!  Here in southern NC we don't see a lot of snow and when we do get snow it comes with a big dose of ice.  As we approach the weekend we are waiting once again for an ice storm so I thought this little snowman would make a good plea for snow :)

I think he is just adorable and he really wasn't hard to put together.  This is a project that could be completed in a day.

3d Snowman head


Doesn't he have the cutest face.  I just love his crooked smile.  The kit does come with a bow but I decided I wanted to use some ribbon I had on hand.  I thought it fit him perfect.  Thank you for stopping by.

3d Snowman head


New to SVG Attic?  Check out these awesome places!


Do what inspires you,
Cyndy G

Wednesday, January 9, 2019

Christmas Thank You Cards

Hello all. Sonja with Sugar Bean Cards here. This year I did not get to my Christmas cards. I know, bad crafter. I mean that is your job how did you not get to it?! Time. That's all that needs to be said.

However, I did get to the traditional thank you cards that I have my children send out to grandparents/family that took the time to give them something for Christmas.

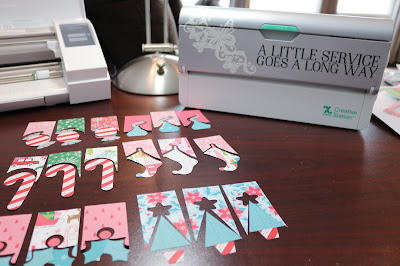
As usual, I didn't want to make all the same cards. I grabbed a variety of SVG Attic/SnapDragon Snippets a6 cards to make a series of 6 cards.
I cut out each element to each card first, organized it, and then ran it through the Xyron Creative Station® to adhere cohesive adhesive to the back of each cut.


Card #1
The first one from the Kisses Hug Trio Card, I changed out the middle pretzel for another kiss.
Each card has a heat embossed sentiment. 
Card #2
This one is from the Peppermint Candy Trio Card file.
I used vellum for the candy wrapper. To prevent warping with the vellum, I used a Tape Runner from Xyron. 
Card #3
The Holly Houses Trio Card can be traditional or cute. I went with cute
Card #4
Holly Trio Card
Card #5
Tree Trio Card
For the stars on this one, I used the stickers that are in the back of this 'Happy Wishes' DCWV stack
Card #6
The Stocking Trio card I found in the Silhouette Design Store. 

Materials Used: 

  • Paper
    • DCWV
      • Happy Wishes
  • Die Cut Machine
    • Silhouette Cameo 3
    • Silhouette Studio-Designer Edition
  • Adhesive
  • Extras
    • Darice Heat Tool
    • Ranger Embossing Black Sparkle powder
    • VersaMark Watermark Ink
FTC disclaimer: I received some of these products for free but was not compensated for writing this post. To view my complete disclaimer, click here.

Sunday, January 6, 2019

Let it snow

Ahhhh January! Once a season full of snow and ice but now......grey, dull, warm and rainy. Uggg!

I really miss snow - sooo much. Knowing that a lot of people hate it because it makes everything slippery and cold, I still love how it lights up everything and dimming down all noise and sounds. I love the sound it makes when walking in it and I love the different beautiful shapes of snowflakes.

So with hope still intact, I made two snowflake projects I want to show you.

First of is the new gorgeous Snowflake Slot Form Swirls 3D Ornament:


I made it in 75% of the original and used AC Cardstock in White and white glitter paper from Best Creation.

It is incredible easy to cut and assemble - just takes a few hours from start to finish and it looks so much like a wood ornament.

I do like to dab a little glue here and there so nothing accidentally moves and it remains super sturdy.

Next I made the 3D Snowflake Northern Cross Star from the JGW Snowflake Stars kit:


I made this in it's original size and it do require a lot of paper - but the result is just amazing!!!

I made it from AC Cardstock in White and Charcoal and decorated with white glitter paper from Best Creation and Silver Metallic paper from Tim Holtz.


Seems like I want to light up everything, so I added holes in the different layers in the lid of the box plus one hole on the side of the box through both lid and base for the string of LED lights to come through.


I also added panels of Silver Metallic paper on the inside of the base for the lights to reflect on, hoping for a greater light effect.


Now I hope for some snow to match my new pretty snowflakes - if you have any to spare - just send it my way please.

Thanks for joining me today - hope to see you again next time.

New to SVG Attic? Check out these awesome places!