Pages

Wednesday, September 30, 2015

Happy Halloween Cards with Beth

Happy Wednesday morning!  Beth from Beth's Beauties here to share some Halloween cards with you.  Every year I send out Halloween cards to all of our family members.  There are SO many cute ones at SVG Attic that I had a hard time picking which ones to start with.
 This first one is from the Ghostly Sweet Tooth set.  I thought it was very cute with all of those layers and the shaped side.
 The candy corn card is from the Spooky Cards set.  It looks a little different than the picture on the website because I wanted my candy corns to by filled in.  All I did was "break apart" the top card layer so all of the pieces were separate.  Then I grouped the pieces I wanted by color and cut them out.  They fit perfectly in the spaces of the top layer!
 Do you see the fun stamp I added to the top?  It is from Pink & Main.  This Saturday, we are having a Halloween blog hop with them!
You can join the Facebook event HERE for a reminder to hop.  We hope to see you there!
I hope you have a wonderfully crafty day!

Monday, September 28, 2015

My Birthday Cake

Good Monday Morning! Tanya from Crafting on Caffeine And yes it is my birthday today! I was so excited when I realized my day to post here on the blog was on my Birthday!  To make my birthday cake I used 3 different files.  Hope you enjoy!


The Cake is from SDS 3D Cake Box Kit Topsy-Turvy Cake. I used my eBrush to edge all the corners and sides. 


The Candles are from SDS Happy Birthday Page Kit. Once I cut them out I then used my score board to make a quarter inch score on both sides and then used my pencil to curve the paper to make it look 3D. Then I glued the folded edges to the side and glued the flame inside. I did trim the candles a bit to make them all look even.


with Candy in my cake it means I get to have what ever flavor I want. hehe


The 40 is from SDS Nested Numbers I cut 2 pairs and put a pop dot in between to make them be able to stand on the cake like those candle numbers you buy.


Here is the rest of what I used to make my cake complete.
All paper used is from DoodleBug Designs

Wishing you a great day! Thanks for stopping by!

Friday, September 25, 2015

SDS Hocus Pocus ~ with Cyndy G

Today I wanted to share with you the new SDS Hocus Pocus Kit.  There are so many cute projects in this kit.  Halloween has always been a very fun holiday for me and my family.  My kids get so excited around this time of year!  I used my favorite paper for this kit - Graphic 45, An Eerie Tale.

Cards, spider, and springy pumpkin

All the projects in this kit are quick and easy to put together and they have such Wow factor.  
I think my favorite piece of this kit is the potion bottle card.

Potion bottle card

Haunted House card

Halloween card

This springy pumpkin is so fun.  You can use your favorite patterned paper like I did or you can use solid color paper.  This pumpkin goes together so quickly and looks so complicated.  

Springy pumpkin

I love this little box.  I used some Limeade - Trendy Twine to tie the box shut.


And last but not least a scary spider!

Scary spider

I added little red eyes to my spider, so spooky!

I hope you have enjoyed my projects today!  
I look forward to seeing what you do with this fun new kit.

Do what inspires you,
Cyndy G.

Wednesday, September 23, 2015

Witch Hat String of Lights with Lisa


Hello everyone! Lisa, from In the Crafting Cave with Lisa, sharing with you today! 
Last Friday I posted the Trio of Witch Hats and mentioned using the Midnight Witch Hat from the SVG Attic Halloween Soiree Collection to decorate a string of lights. Well, I'm happy to 
be sharing that project with you today!

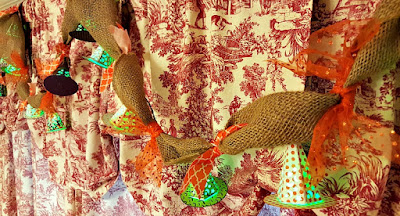
SVG Attic Halloween Soiree Midnight Witch Hat Lights
And one lucky person is going to win a $20 SVG Attic Gift Certificate to  get them started on their Holiday Projects! You can find all the details at In the Crafting Cave with Lisa . 
 
SVG Attic Halloween Soiree Midnight Witch Hat Lights
 Here are the lights hanging over my dining room window. I dressed them up with burlap(to cover the cord) and orange tulle and ribbon to hold the burlap in place.  
 SVG Attic Halloween Soiree Midnight Witch Hat Lights


SVG Attic Halloween Soiree Midnight Witch Hat Lights
You may want to checkout the tutorial of the Midnight Witch Hat Box to familiarize yourself
with the pieces.

Tutorial
Once you load the Midnight Witch Hat Box cut file into your software you will need to size it to fit 6x6 paper (if you are using 6x6 papers). If you are using a different size paper the assembled hat is approximately 3in. in height.  I arranged mine to cut four hats at once.

IF YOU ARE USING DOUBLE SIDED PAPER YOU ONLY NEED ONE 
BRIM(circle). MY PAPER IS ONLY PATTERNED ON ONE SIDE SO I OPTED FOR 
TWO BRIMS GLUED TOGETHER. WHEN YOU ARE LOOKING AT THE LIGHTS YOU DON'T SEE WHITE ON THE UNDERSIDE.
 You can see my 6x6 papers lined up on my mat.
This is after cutting.
You will need  the strand of lights in front of you. It helps to stretch them out across 
your work area, if you have room. I used a string of 20.
First, I cut all the bases out of vellum. I started assembling these while the machine was busy cutting the rest of the hat. You can make fast work of this if you have two mats. 

I assembled the bases and set them aside. As my hats came off the machine I started gluing the two brims together (if you are using double sided paper you can skip this step). And inking the brim so no white showed. You don't have to do this, I just prefer it.

Now I have all my hats cut, the brims glued together and the vellum bases are attached to the brims.

It should look like this at this point.
(I have a tealight in this one)

 I'm ready to start assembling the hats 
around the lights. First, cut the tip of each hat off. This allows enough room for the cord.

Lay the light on the top part of the hat and assemble. 
Once you have the top of the hat assembled around the light you can attach the bottom to complete the hat. Be sure to use adhesive to hold them together. The lights will be hanging and this will ensure your hats stay together.

SVG Attic Halloween Soiree Midnight Witch Hat Lights

Now you only have 19 hats to go!

Happy Crafting! 


Monday, September 21, 2015

Stack Drawers with Angeline

Beautiful Monday to all!
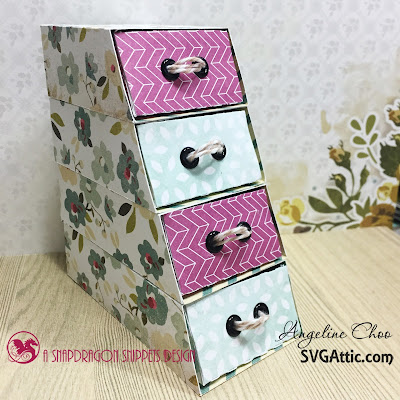
Angeline here to share with you this cute little stack of drawers I made using the JGW Sweet Mother kit.

SVG Attic: Stack Drawers with Angeline - JGW Sweet Mother #svgattic #scrappyscrappy #svg #cutfile #drawers #papercraft #trendytwine

I used some Webster's Pages & Heidi Swapp papers for that floral vintage look.

SVG Attic: Stack Drawers with Angeline - JGW Sweet Mother #svgattic #scrappyscrappy #svg #cutfile #drawers #papercraft #trendytwine

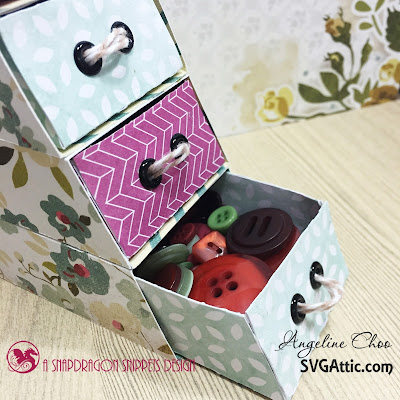
Here are the drawers all pulled out!
I used some Trendy Twine (Krazy for Kraft) and looped it 3 times to the eyelets that I have attached to each drawer --- so that I can pull it out easily! :)

SVG Attic: Stack Drawers with Angeline - JGW Sweet Mother #svgattic #scrappyscrappy #svg #cutfile #drawers #papercraft #trendytwine

A cute little stack of drawers for buttons, embellies and more!
Thanks for stopping by and have a great week ahead.

Angeline Choo
blog // facebook // instagram // youtube

Friday, September 18, 2015

Trio of Witch Hats with Lisa


Happy Friday everyone! Lisa, from In the Crafting Cave with Lisa, with you today sharing 
a trio of Witch Hats. With Halloween right around the corner I thought I would get started on a few items to decorate around the house. I used the Midnight Witch Hat from SDS Halloween Soiree Collection to create these hats. I'm using battery operated votives. Another idea for this is to make them a bit smaller and put them on a string of Halloween lights.


I tried going all out with embellishments but it just seems to be a distraction for those amazing star and moon cutouts.  So I followed the KISS method(keep it simple silly) and I love the way they turned out. 

I used 6x6 papers and resized the hat to fit on the paper. I actually cut two pieces at once by laying two pieces of 6x6 papers side by side on my mat. I cut three of the inside pieces at once on a 8.5"x11" piece of vellum. 
You can find more details on the supplies I used on my blog, In the Crafting Cave with Lisa.

Thank you for stopping by today. I hope your weekend is filled to the brim with crafting!

Wednesday, September 16, 2015

Above it all!

Hi everyone !!

Sorry for the delay but I had a little problem with my internet connection! But it seems that arrived in time to show you my second project as Guest Designer!!

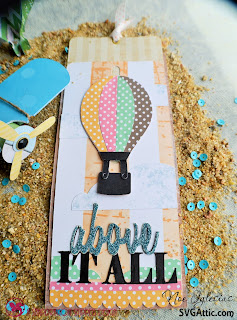
When I saw the "Above it all" kit  I knew it would be mine ... my older son (4 years old)  loves airplanes and Air balloons!


I had said you in my previous post that I love cards and this "Slider Card" couldn´t be less !! 


Look!! The "Sun and Cloud Card" it´s perfect to make with kids!!


And what about the Air Ballons?? They are great !! It Can be hang from anywhere: a lamp, the handle of a door, a bookcase or even make several and hang them from the ceiling ... they are fun and easy to assemble!


I hope you liked my interpretation of  "Above it all" kit! 

I can only be grateful for the opportunity of being Guest Designer for a month in SVG Attic Blog... It was very funny!

Thank you for visiting  today and I hope you will stop by the SVG Attic store to see all the fun SVG collections they have for you there and remember join at the SVG Attic Fanatics group on Facebook... You'll find lots of inspiration and fun there.

Monday, September 14, 2015

Preview of Autumn Cards Collection

Happy Monday! Tanya from Crafting on Caffeine here today.  This post is an advance "preview" of the card designs that I have styled for the upcoming set release.  There are 6 total cards and I had so much fun putting them all together.


This first card is the "Autumn Tree Leaves Double Cascade" card.  I used  vellum in between the front and back panels and then used my eBrush to add other colors. I also pop dotted a few of the leaves and the banner to give it an additional dimension.


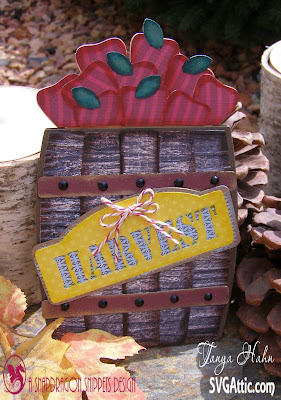
This next one is a box card or maybe we should say barrel shaped lol.  The file comes with cuts for the black dots but I used brads. I also used Orange Truffle Trendy Twine, to hold the sign.


This one is Howdy, a scarecrow shaped card.  Such a fun and easy card. 


This one is a Leaf Flake card. In the beginning I wasn't sure about the different patterns but after I used my eBrush with a bronze sharpie I fell in love with it.


Here is the 3 Vintage Pumpkins card. I love the scrolling in this one. I did add the sign it is a die from Jaded Blossom's Fall Dies Set the stamp is from Thanksgiving Wishes. I also used Trendy Twine's Orangesicle.


And last but not least is the barrel slider gift card holder. I used my Cut n' boss to emboss the wood panels I also used brads again instead of the dots that come with the cut file. I used Lemon Peppermint Trendy Twine to add a bit of pop to the sign.

 Hope you enjoyed your preview, as soon as it's listed in the store I will update my blog with the link. Thank you and have a great day!