Pages

Showing posts with label Graphic 45. Show all posts

Sunday, December 23, 2018

Good Night Santa

As I promised, here is my last Christmas post this year and I need to do this a little quick, because I need to finish making tomorrow's dessert today.

Ok....I made one of the older files this time, namely Santa's Arm Chair Box from the JGW Santas Repose kit:


I simply couldn't shake the vision of Santa coming home after a busy night delivering presents and being exhausted, just wanting some quiet time in his chair in front of the fireplace.

The chair is made from AC Cardstock in Pomegranate, Cranberry and Vanilla along with several pieces of patterned paper from "St. Nicholas" by Graphic45 and two shades of green Pearl paper.

I used two ball chains to hang the Santa sign onto the chair.

I wanted to make a footstool too but ran out of time - but I imagined making one with the Candle 3D Stand 3 Inch Pillar just downsized and maybe altered a bit - oh well some other time.


Santa's hat is from the Santa Clause 3D Canister in the JGW Winter Friends Canister kit and the stocking I snatched from the Stocking Trio A6 Card that I found in the Silhouette Design Store design ID #88698. I just added some Stickles Burgundy glitter glue to the top and bottom for a little extra detail.
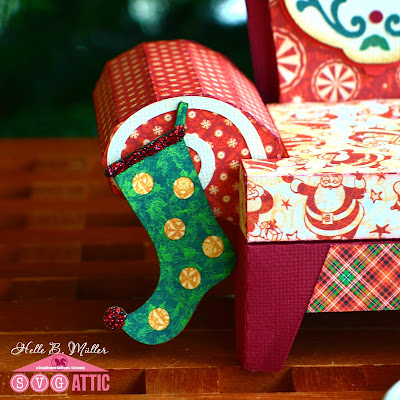


They are made from AC Cardstock in Vanilla and various patterned papers from the "St. Nicholas" Collection.


There….I kept it short for once ha ha. Now it's dessert making time and then onto wrapping the last gifts - then I'm all set for celebrating Christmas tomorrow night (we do the whole eating and gift giving on the eve of the 24th. here in Denmark)

Happy Holidays to all of you - whatever you're celebrating and I hope you'll have wonderful couple of days of rest, relaxation and maybe…..just maybe….a little time to sneak of and craft a little.

New to SVG Attic? Check out these awesome places!


Sunday, December 9, 2018

Bells Will Be Ringing

Last Sunday I showed you some 3D Christmas ornaments I'd made and that kinda kick-started my brain to come up with some more.

I really enjoy making ornaments because I get to play with all my Christmas papers, get glitter all over the place and get to watch the beautiful ornament that I made on our Christmas Tree.

This Spring, SVG Attic released a kit called Liberty Lane and in this kit, you will find a 3D Liberty Bell Box that is perfect for 4th. of July but also for Christmas.


To make it into a Christmas Bell, I omitted the Yoke and used the panels without the crack.

I made two bells and they are downsized by 50%. I used the Bow 3D for Large Package that I also downsized by 50 % and the Sprigs from the Pine Sprigs Window A7 Card (also downsized but only slightly)

The Bells are hot glued together at an angle. I tied some gold twine onto the middle of the Bow and then added the Bow and Sprigs also with hot glue.

The Bells are made from AC Cardstock in Vanilla and Gold Glitter paper from Artemio. The Bow is made from patterned paper from Graphic 45's "St. Nicholas" and the Sprigs are made from green pearl paper.

Finally I also added two small gold Jinglebells at the bottom of the bells.

A very cute addition to my ornaments if I may say so myself.

Thanks for joining me on this 2nd. Sunday of Advent. I hope the rest of your day is filled with Christmas "hygge"

Happy Birthday Jodi!

New to SVG Attic? Check out these awesome places!


Sunday, December 2, 2018

Dimensional Ornaments

Happy 2nd December - YAY.....we're officially in the month of Christmas and counting down to the big day/night. And on top of that - it's 1st Sunday in Advent. Lighting the first candle today.

Yeah - I'm still like a kid (in oh so many ways) that gets all excited about Christmas. My decorations were up by mid November, we've startet on our Advent Calendars (me and the kids) and today is present day. The kids get a present each in their "Stocking" - usually money cause that's all they want (yes I have big kids now).

I have been busy all week making myself some new Christmas Ornaments from SVG Attic and as I'm a nut for Graphic 45 paper, I found all the Christmas collections I had in store and chose out some patterns that would work for this project.


All of these ornaments are made double sided so it can be seen from all sides.

Ok - let's get started! First one is the Patchwork 3D Star Ornament from the Just Be Claus kit:


For this I used AC Cardstock in Vanilla and several patterned paper from Graphic 45's "St. Nicholas" Then I inked the edges with Distress Ink.

I also downsized the ornament to 75% of the original so it won't be too big for our tree.

Then I made the Snowflake 3D Six Point Star Ornament from the Winter illuminations kit:


I also used AC Cardstock for this one in Cranberry and patterned paper from Graphic 45's "Winter Wonderland." This too is inked with Distress Ink and downsized to 75%

This is made from AC Cardstock in Cranberry, Tim Holtz Metallic Paper in Gold, White Glitter paper from Best Creation and patterned paper from Graphic 45's "A Christmas Carol"

This is downsized by 50% and inked with Distress Ink. I also added a gem to the flower center on both sides.

I used AC Cardstock in White and White Glitter Paper from Best Creation.

I then added two glass snowflakes from my stash and glued two snowflake sequins onto those for a little extra.

This one is made in the original size.

Finally I made the Snowflake 3D Slot Form also from the Winter Illuminations kit:


It is, like the previous ornament, made from AC Cardstock in White and White Glitter paper from Best Creation.

This one is also downsized to 75%

Wow - that was a bit long - sorry about that. Hope you like them despite this and if you do, please leave a little love in a comment below.

Until next time - have a wonderful 1st Sunday in Advent.

New to SVG Attic? Check out these awesome places!

Thursday, September 27, 2018

The Lone Rooster

Hello - I hope you're having a nice Thursday today.

I'm just popping in to show you the awesome Rooster 3D Large Figure that I made some days ago. He is just perfect for fall and I found him very intriguing so I just had to make him.

I also had an ulterior motive for making him - it was my next door neighbors Birthday and she and her husband has a Chicken Coop and lucky for us next door - no rooster. Not that I go around the whole town and give everybody presents, but I wanted her to have him, just like saying: Please let him be the Lone Rooster in the Coop.

Here he is:
He is made from AC Cardstock in Clay, Mustard, Latte, Coffee and Cranberry and decorated with patterned paper from Graphic 45's "French Country" and some Swiss Dot Bazzill cardstock.

I inked all the edges with Distress Ink from Ranger and dotted his eyes with a White Sharpie.

He is surprisingly easy to assemble and stands well on his own. 


I really hope my neighbor likes him and gets my little joke.

Thanks for visiting today - hope you like the Lone Rooster.

New to SVG Attic? Check out these awesome places!

Friday, September 7, 2018

Steampunk Gears ~ with Cyndy G

Good morning.  Thank you for stopping by.  Today I am sharing a project using files from SVG Attic.  I used the gears from Steampunk Gears Cogs and Sprockets 3 as the base for my Steampunk Debutante wall hanging. 

Steampunk wallhanging


I added a solid background piece by breaking apart the main gear and removing all the extra pieces.  I cut three layers for the back for added stability. 

Steampunk wallhanging


Steampunk wallhanging


I fussy cut pieces from the Steampunk Debutante paper collection by Graphic 45 and added some metal embellishments.  I also used Mod Podge to protect and harden my finished project.  Thank you for stopping by today.


New to SVG Attic?  Check out these awesome places!


Do what inspires you,
Cyndy G

Monday, July 30, 2018

More Christmas in July

Hello, Helle here - thanks for joining me today.

I have briefly taken over the blog today to show you a Christmas project I just made. Yes.....I want in on that Christmas in July too.

I've been meaning to make this one for a looooong time, but as you know, Jodi keeps putting awesome stuff out there so I got distracted, but now I finally succeeded.

The 3D Church Card Holder from the JGW Colonial Christmas kit:


I made the Church in AC Cardstock in Vanilla and decorated with Graphic 45 papers from the Christmas Carol Collection.


I inked all the edges with Chalk Ink from Ingvild Bolme and added a poinsettia from Prima to the front of the Church.

Now it's ready come Christmas time for all the Christmas cards coming in from near or far...…

….or simply as a Christmas decoration with lights in it.


Thank you for stopping by today and Ehm....Merry July Christmas.

New to SVG Attic? Check out these awesome places!


Friday, July 27, 2018

Christmas in July - Part II ~ with Cyndy G

Happy Friday crafters!  Today I am sharing a fun project using the Six Point Star Snowflake from the Winter Illuminations Kit.  I love this file.  I loved the snowflakes just as they are but I wanted to take them to the next level.

Six Pointed Star Snowflake Christmas decoration with ballerina in the center

I used Graphic 45 - Nutcracker Sweet and did a lot of fussy cutting.  The base of the snowflake has three layers, two cut out of patterned paper and one out of thin chipboard.  I used Mod Podge on each individual layer and added the dimensional diamonds to the center.  I used Mod Podge to glue all three layers together and let them dry overnight.  This made the ornament very sturdy.  


Six Pointed Star Snowflake Christmas decoration with Nutcracker and grandfather clock in the center

 While the base was drying I cut multiples of the same image and layered them with foam tape for dimension.  I inked all the edges and used Mod Podge on all the individual pieces.  While the pieces were still wet I molded them, adding waves in the banners, ripples in the ballerina skirts and molded the page cut out to make it look more like a book.  These were also left to dry overnight.

Six Pointed Star Snowflake Christmas decoration with Nutcracker in the center

The next day everything was ready to assemble.  This is one of my favorite paper collections and I am very please with how my ornaments turned out. 

Six Pointed Star Snowflake Christmas decoration with two ballerinas in the center

  Thank you for stopping by.

New to SVG Attic?  Check out these awesome places!


Do what inspires you,
Cyndy G

Sunday, July 1, 2018

Be a Unicorn

I am ashamed! Very ashamed of myself. Because I didn't send a good friend of mine something for her Birthday last week. It was in my calendar but I've been so busy getting ready to go on vacation, that I didn't have time to make her anything and of that I am ashamed.
So better late than never, I'm going to send her this Unicorn Rainbow 3D Box Card....

….cause I know she loves unicorns as much as I do and this will put a smile on her face and maybe….just maybe….she'll forgive me for being so late.
I made the darling card with AC Cardstock in various colors to match the Graphic 45 paper (Fairy Dust) that I used and then I sprinkled some fairy dust in dots here and there for magic and good luck.


The sentiment says Congratulations in Danish and it's written on the Magical Layered Banner.
It's a very fun card to make and it won't be my last.
Thanks for stopping by today - please feel free to leave a comment to yell at me or just to tell me if you like the card.
New to SVG Attic? Check out these awesome places!

Friday, June 29, 2018

Specially For You ~ with Cyndy G.

Happy Friday today I am sharing a project from SVG Attic.  I made the tulips bouquet pop up card from the Tulips Festival Kit.  This is such a beautiful card!

Handmade card in soft pastels

I used Graphic 45 - Once Upon A Springtime paper.  I love the soft colors.  I changed the center on the front card from the oval to the more decorative shape from the inside.  I inked all the edges to define the two different papers.

Pop up center in card with a flower bouquet

I am giving this card to my friend for her birthday. I used the "Happy Birthday" using my Graphic 45 - Time To Flourish stamp set.

Pop up center in card with a flower bouquet

I just love how the flowers turned out.  I used a coral and then a pink ink around the edges of the flowers.  I also inked the basket in brown.  When making this card make sure to take extra care when gluing the inside panel.  It is important that the seams line up exactly.

Thank you for stopping by.

New to SVG Attic?  Check out these awesome places!


Do what inspires you,
Cyndy G

Sunday, June 24, 2018

Come Away with Me

Happy Sunday and welcome back.

Ahhhh! - Now it's Summer time and soon time for my annual Summer vacation. Something we treasure highly in my family as everyday can sometimes be a bit harsh due to all our challenges. So this time, once a year, we throw all our cares away, get on a plane and fly down south and this year we'll be visiting Mallorca - the largest of the Balearic Islands, Spain. We've been there before but we do love this island, so we decided to go back.

The only thing I don't look forward to is 14 days without my crafting…...YIKES! Gotta smuggle something with me so I don't go mad (Ehm....more mad)

Ok so with this in mind, I decided to make something with a travel theme and my eyes landed on the gorgeous Round Traveling Case from SVGAttic's JGW Fashionably French kit. I've seen many versions of it made the last couple of months and wanted to make my own - and here it is:


I used AC Cardstock in Vanilla, Chestnut and Coffee along with the delightful Graphic 45 paper "Come Away with Me" collection that seems just right for this project. 

I also used some Cricut Faux Leather for the strap, metal colored dots as nail heads and a ball chain to hold the tag and a tiny metal key.


Then I dived into my huge stash of Prima flowers and found some that matched the paper real well along with a rhinestone swirl. Finally I also found some glass cabochons to decorate with.


Such a fun project to make and the suitcase goes together so easy but looks so amazing - don't you think? Tell me in a comment.

Thanks for stopping by today - I really hope you like my version of the suitcase.

New to SVG Attic? Check out these awesome places!