Pages

Wednesday, November 29, 2017

Christmas Advent Calendar Tree

Phew that title is a mouth full! Hello all. I-team member Sonja here with my take on the newest JGW Christmas Ornament Tree (currently on sale). Now I wanted to do an advent calendar for my kids because like many of you, mine are driving me nuts asking me when Christmas is! Once I saw this new set in the store, I knew it would be perfect to make it into an advent calendar.
JGW Christmas Ornament Tree
I put in a little extra work as everything from the tree topper, stand arms, and the ornaments are double sided to accommodate the numbers for our countdown.

To bring extra highlights to my pieces, I grabbed my Craftwell eBrush and some Sharpie markers to bring some color to the edges. 
My 5-year-old came over while I was doing this and asked "whoa is that magic". Yes, yes it is! 
Other than using the Cameo 3 and the eBrush, I didn't add any other fancy machinery to this project. I wanted to focus on the project itself.
The front of my tree has numbers 1-12
 I have to say the poinsettia ornament was my favorite out of all of them.


 Flip the tree around and there are numbers 13-24 to finish off the tree

Materials Used: 

DCWVinc. Christmas Flip/Side 12 x 12 in stack and Very Merry 12 x 12 in stack

SVG Attic JGW Christmas Ornament Tree file
Silhouette Cameo 3
Silhouette Studio~Designer Edition
Craftwell eBrush
Sharpie Markers, greens, red, and brown
Aleene's Original Tacky Glue
Recollections Gold Brads

Monday, November 27, 2017

Snowflake Star

This was really such an easy project. I will for sure be making more of these.  This is from JGW Snowflake Star collection.  I'm in love with it!


I used DCWV Mercury Glass Stack. I used a light gold and a silver color

Thanks for stopping by. See you again soon!


Sunday, November 26, 2017

Colorful Christmas

Hello and Happy Thanksgiving :-) I hope everything went according to plan and all are happy and full.
 
Today I want to show a small project I've been meaning to make for quite some time now. I admit I was a bit intimidated by it, but lately some of my projects have been rather challenging so I looked at it again and thought: Naaahhhh you can do it!
 
I'm talking about the cute Candy Cane Box from the JGW Santas Repose kit 

 
It's made from Rouge AC Cardstock and the stripes are some thin washi tape I found in my stash. Made it very easy to wrap.
 
The pinecone is made from Chestnut AC Cardstock and decorated with two types of glitter so it looked frosted.


Finally the holly is made from Pine and Spinach AC Cardstock and decorated with Cricket POW Glitter paper from AC.
 
 
I am really surprised how easy everything was to make and assemble - what was I fearing???? Sometimes you just have to tell that head of yours to be quiet and dive in!
 
I stuffed this baby full of red, green and purple Skittles and it's all ready as gift for a lucky someone.
 
Thanks for stopping by today - ahead is a full month of Christmas with lots of creative projects, yummy treats and lots of cozy moments with friends and family.....Oooooooh I'm so excited!


Friday, November 24, 2017

Tis The Season with Lisa

Happy Friday, everyone! Lisa from The Relativity of Paper taking over the blog today with my first Christmas Project. It's been two years since I've used the Mourner's Hat from the JGW Raven Quest Kit to create a Christmas Top Hat. 


I originally made this hat for my Mother and she used it for two years. And then I said "Mom, it's time to let it go", it was becoming a little worn. She insisted that I make another one to replace it, I agreed and here we are.  I used DCWV Merry Memories Stack and the embellishments are repurposed from an old "designer" tree she had. 


And here's the original hat from two years ago and a link to that post, The Magic of Christmas. 

Here's to a wonderful Holiday Season! 


As always, thanks for joining us today!


Wednesday, November 22, 2017

Tomorrow is Thanksgiving!
And then its my most favorite time of the year.


Tracy here from the Idea Closet and I love counting down for Christmas; every year we do a few different advents.

This year I used the Calendar Blocks from SVG Attic, Santa Cant Wait,  to create count down blocks.

This was such a fun project and there is so many ways to decorate it.

For the words, instead of the months, I printed "Here Comes Santa" and placed it on the front block.


The instructions to put this project together can be found here.

And the best part...


...I can use the blocks as dice when we play our white elephant game at the family party.

I hope you enjoyed this project and give it a try.

New to SVG Attic? Check out these awesome places!

Monday, November 20, 2017

Christmas Cookies with Beth

Good Monday Morning!  Beth from Beth's Beauties here.  I recently was baking Christmas cookies to freeze for next month, and that spurred me to create this set of projects for you today!  All of the files are from SVG Attic's JGW Mama Kringle's Kitchen.
 The Pretzel card was quick to assemble.  I inked around the cuts with brown chalk ink for extra dimension.
 I also inked around the cuts on the tart (or as I like to see it, pie!) card.  For the topping, I brushed Crackle Accents on it and added glitter.  It really looks like a pie crust that is crackled and glittery with sugar!
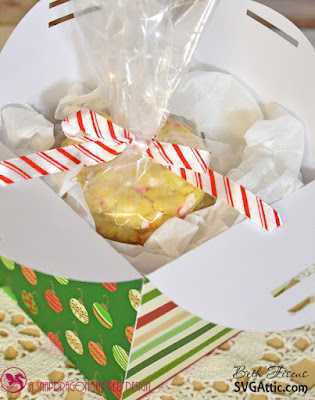
 I also made the ribbon box from that set to hold some cookies!  You can find the tutorial for assembling this box HERE.  All patterned papers on these projects are from DCWV's Hand Painted Christmas stack.
Here is the inside of the box.  It fit 9 cookies inside!  If you are interested in the recipe for these White Chocolate Peppermint Pudding cookies, head on over to my blog for the details.
I hope you have a wonderfully crafty day!

New to SVG Attic? Check out these awesome places!

Friday, November 17, 2017

Christmas Dress Form ~ with Cyndy G

Hello today I am bringing you a project I made with files from SVG Attic.  I created this beautiful Christmas Dress Form using the dressmakers mannequin and mannequin skirt cage from the JGW Just Sew kit, the branches of the Noble Fir from the O Christmas Tree SVGA kit and the Poinsettias from JGW Poinsettia Passion.

Dress Form

The paper I used is DCWV Cranberry Christmas - it is just beautiful.  I got it at Michaels and it will be on sale next week for $5.  What a great deal!


Thank you for stopping by.

New to SVG Attic?  Check out these awesome places!


Do what inspires you,
Cyndy G.

Wednesday, November 15, 2017

Snow Flurries ahead

Hello all I-team member Sonja here with my latest project. Really the only part of winter I look forward to is when I get to pull my snow globes out! In honor of them, I decided to make this snow globe from the JGW Snow Flurries set with a little extra kick to it at the end.
JGW Snow flurries
When I saw the globe, I knew right away that I wanted to do the snowman in vellum. However, vellum can be a little tender to work with if glue is involved. To prevent the vellum from shriveling up, I wanted to use my tape gun to adhere the hands. But then, *light bulb*, hello I have the Xyron Sticker Maker! I use this little handy dandy object for small projects just like this. 

 I ran the arms through the sticker maker
Before peeling off the top layer, I rubbed around each element with a sharp end of a pencil to eliminate any extra tape.
 The final project came out well with some added snowflake embellishments.

The bottom of the globe is a box to add any extra goodies to. However, I wanted to add a different kind of goody to it.
On my Christmas globes, many of them have lights and blowers in them. To replicate that, I added a hole to the top plate of the box.
 Then I added a little tea light.

Materials Used: 

DCWV Cranberry Christmas stack
SVG Attic JGW Snow Flurries file
Xyron Create a sticker Model 150
Silhouette Cameo 3
Silhouette Studio~Designers Edition
Aleene's Original Tacky Glue
Craftwell eBrush
Gray Sharpie Marker

Monday, November 13, 2017

Thanksgiving Layout

Good Monday All! Tanya from Crafting on Caffeine here today and I have a cute layout to share with you. 


I used JGW Thanksgiving Ornaments for the pumpkin Pie slices. And for the phrases I used Thankful Captions


All paper is from Doodlebug (different collections)

Thank you for stopping by. 

Sunday, November 12, 2017

Winter Fun

Hello! If you're anything like me, you can't wait for the white gold to start falling and for Jack Frost to make nature sparkle and glitter. Winter is definitely my favorite season (that is when it behaves the way it should and not the foggy, rainy, warm winter) so that is what it's all about today.
 
I just couldn't help myself to make the cute Igloo from the SDS Frosty Friends kit
 

It is made out of AC Cardstock in White and Blueberry and decorated with Sparkle Paper in White and Maja Design Paper "Joyous Winterdays". Just follow the instructions found here and you'll be all set - easy peasy!
 
I also wanted the Igloo to look inhabited, so I made a small sled for the owner.
 
 
The sled is from the JGW Made of Snow kit. It's made of AC Cardstock in Chocolate, Slate and Black along with some wood patterned paper from KaiserKraft. I used a tiny black brad for the steering pad and some twine. The small rivets are made from small dots of Enamel Accent from Tim Holtz. I did size this one down to match the size of the Igloo. You find the tutorial for the sled here.
 
The owner is also keen on skis, so I made him a pair from the JGW Winter Wonderland Wreath
 

These skis are made a bit bigger to match the size of the Igloo and sled and are made from AC Cardstock in Chocolate and Charcoal and with patterned paper from KaiserKraft. These are soooo easy to make and you find the tutorial here.

At night the igloo lights up with a cozy light ;-)


So now the small but lucky owner of the Igloo is ready for the upcoming frosty season and I look forward to many more cool and glittery projects in my warm and cozy craft room :-)
 
Thanks for visiting today - please leave a small comment on your way out <3

Oh and enjoy this small video
 
New to SVG Attic? Check out these awesome places!