Pages

Sunday, December 9, 2018

Bells Will Be Ringing

Last Sunday I showed you some 3D Christmas ornaments I'd made and that kinda kick-started my brain to come up with some more.

I really enjoy making ornaments because I get to play with all my Christmas papers, get glitter all over the place and get to watch the beautiful ornament that I made on our Christmas Tree.

This Spring, SVG Attic released a kit called Liberty Lane and in this kit, you will find a 3D Liberty Bell Box that is perfect for 4th. of July but also for Christmas.


To make it into a Christmas Bell, I omitted the Yoke and used the panels without the crack.

I made two bells and they are downsized by 50%. I used the Bow 3D for Large Package that I also downsized by 50 % and the Sprigs from the Pine Sprigs Window A7 Card (also downsized but only slightly)

The Bells are hot glued together at an angle. I tied some gold twine onto the middle of the Bow and then added the Bow and Sprigs also with hot glue.

The Bells are made from AC Cardstock in Vanilla and Gold Glitter paper from Artemio. The Bow is made from patterned paper from Graphic 45's "St. Nicholas" and the Sprigs are made from green pearl paper.

Finally I also added two small gold Jinglebells at the bottom of the bells.

A very cute addition to my ornaments if I may say so myself.

Thanks for joining me on this 2nd. Sunday of Advent. I hope the rest of your day is filled with Christmas "hygge"

Happy Birthday Jodi!

New to SVG Attic? Check out these awesome places!


Friday, December 7, 2018

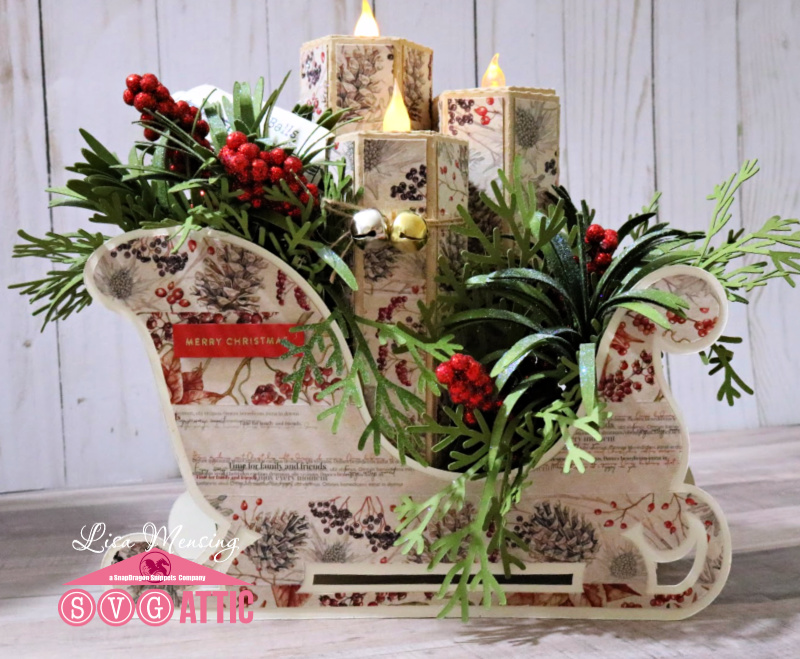
Sleigh Bells


Hello and welcome, everyone! 

Lisa from The Relativity of Paper bringing you another Christmas project. I've paired two amazing sets to create my project for today and I'm so excited to share it with you all. 

I paired the sleigh from CG Nutcracker Dream Set with the candles and greenery from the Centerpiece Tray with Candles and Greenery Set


 I used 12 x 12 Kraft cardstock, lined it with Alexandra Renke Washi Tape for the sleigh accent pieces while the Silhouette cut the sleigh. I repeated the process for the candles. I let the greenery cut while I started assembling the sleigh. Once the greenery was cut and assembled, I used floral wire to create two bunches one larger than the other to arrange around the candles. 

 I used the Silhouette to sketch the sheet music and title, then rolled and hot glued into place. 

 The red berries are from Christmas picks I had in my craft room. 
I'm sure a few are wondering why the silver and gold sleigh bell. It's a little nod to my dad. Every year when Burl Ives comes on the radio singing Silver and Gold my dad belts out the lyrics, "Silver and gold, silver and gold".  Memories that I cherish. 

Thanks for stopping by! 

As always, thanks for joining us! 
New to SVG Attic? Check out these awesome places!
SnapDragon Snippets 


Wednesday, December 5, 2018

Santa Wood Block- Made From Paper


Tracy here from Idea Closet and today I am sharing a new project with SVG Attic.
I love wood blocks but they can be heavy and hard to store.  

SVG Attic has this super cute Santa Wood Block kit, but the secret is it is 100% made from paper!

The file is part of the Just Be Claus Kit collection from SVG Attic.


To give my block a real wood feel,  I inked the edges of the box and the paper with a dark brown stamp pad and made it look like it had been stained. 

The hat cuff is cut from a printed paper with a wood look to it.

The beard and mustache were run through my Big Shot with a Snowflake embossing folder.


For even more details, I created some "sprigs" to place with the holly.
To make the sprigs, I used the head of the reindeer from the reindeer pillow box, also included in the collection. 

I also cut 3 berries to cover up the base of my new "sprigs".

For the eyes, I had some black epoxy dots.

The project is pretty straight forward, however if you get stuck, Jodi has great instructions here.

I am so happy with my paper-wooden block.

Thank you for joining me today.


Monday, December 3, 2018

Laurel Wreath Impossible Card with Beth

Good morning to all my crafty friends!  Beth from Beth's Beauties here with you today.  I am sharing my version of the SVG Attic Laurel Wreath Impossible Card.
These cards are quite simple to make, once you realize how they are made!  Jodi has a great tutorial HERE if you get stuck.  I used patterned papers from DCWV's Red & White Christmas stack and solid papers from DCWV's Flipside Christmas stack.  The leaves are inked with dark green chalk ink and the embellishments include an organza bow and red Stickles.  I used Scotch tacky glue to assemble the card.
 I added a stamped sentiment from the APB Merry Christmas stamp set.  Now it is ready to send to someone special for Christmas!

I hope you have a wonderfully crafty day!

New to SVG Attic? Check out these awesome places!
Sunday, December 2, 2018

Dimensional Ornaments

Happy 2nd December - YAY.....we're officially in the month of Christmas and counting down to the big day/night. And on top of that - it's 1st Sunday in Advent. Lighting the first candle today.

Yeah - I'm still like a kid (in oh so many ways) that gets all excited about Christmas. My decorations were up by mid November, we've startet on our Advent Calendars (me and the kids) and today is present day. The kids get a present each in their "Stocking" - usually money cause that's all they want (yes I have big kids now).

I have been busy all week making myself some new Christmas Ornaments from SVG Attic and as I'm a nut for Graphic 45 paper, I found all the Christmas collections I had in store and chose out some patterns that would work for this project.


All of these ornaments are made double sided so it can be seen from all sides.

Ok - let's get started! First one is the Patchwork 3D Star Ornament from the Just Be Claus kit:


For this I used AC Cardstock in Vanilla and several patterned paper from Graphic 45's "St. Nicholas" Then I inked the edges with Distress Ink.

I also downsized the ornament to 75% of the original so it won't be too big for our tree.

Then I made the Snowflake 3D Six Point Star Ornament from the Winter illuminations kit:


I also used AC Cardstock for this one in Cranberry and patterned paper from Graphic 45's "Winter Wonderland." This too is inked with Distress Ink and downsized to 75%

This is made from AC Cardstock in Cranberry, Tim Holtz Metallic Paper in Gold, White Glitter paper from Best Creation and patterned paper from Graphic 45's "A Christmas Carol"

This is downsized by 50% and inked with Distress Ink. I also added a gem to the flower center on both sides.

I used AC Cardstock in White and White Glitter Paper from Best Creation.

I then added two glass snowflakes from my stash and glued two snowflake sequins onto those for a little extra.

This one is made in the original size.

Finally I made the Snowflake 3D Slot Form also from the Winter Illuminations kit:


It is, like the previous ornament, made from AC Cardstock in White and White Glitter paper from Best Creation.

This one is also downsized to 75%

Wow - that was a bit long - sorry about that. Hope you like them despite this and if you do, please leave a little love in a comment below.

Until next time - have a wonderful 1st Sunday in Advent.

New to SVG Attic? Check out these awesome places!

Friday, November 30, 2018

Santa Countdown ~ with Cyndy G

Good morning, I hope everyone had a wonderful Thanksgiving.  I always enjoy spending the day with my family.  I can't believe Christmas is just four weeks away.  If you enjoy doing an advent calendar then now is the time to get it out.  Today I am sharing the Santa Star Pockets Countdown, the file does have two parts so make sure you pick up both parts.

 Santa Advent Calendar

I shrunk my Santa.  I cut him at 58% and as you can see it is still pretty big.  Mine came out to be about 24" long and 7" wide.  I used one sheet of Graphic 45 for the pockets and the rest is just some heavy cardstock.

Santa Advent Calendar

This project was easy to put together but except to spend the better part of a day to finish this project as there are a lot of little pockets to put on.  Thank you for stopping by today.


New to SVG Attic?  Check out these awesome places!


Do what inspires you,
Cyndy G

Wednesday, November 28, 2018

Christmas Dress

Hello all. Sonja with Sugar Bean Cards here with my latest project. Now one thing I find myself doing is taking two or more files and mashing them together to see what I can create. Sometimes it works, sometimes it doesn't. I have stopped trying to figure out how or why my brain works this way, but here we go.......

I took the newest Centerpiece Tray with Candles and Greenery Kit file and mixed it up with the Dressmakers 3D Mannequin file.


I had a very specific 'dress' design in mind so I modified the top of the dress to fit what I was thinking I wanted, a sweetheart neckline. 
Before I started to assemble the top, I ran the pieces through my Sizzix Big Shot to emboss some swirls on it just for fun.
Next I took some small rosettes and rolled them with my quill set.
I also used my longer quilling tool to roll the greens. The kit has middles that you can do this without a quilling tool, but it was quicker and easier for me to do it this way without the stem piece.
Next I assembled the greens on the skirt portion, starting from the bottom to top. 
I glued the rosettes to some twine I wrapped around the skirt and top just for a little decoration before assembling the side decoration piece which is downsized considerably.
 Final Project: 


Materials Used: 


FTC disclaimer: I received some of these products for free but was not compensated for writing this post. To view my complete disclaimer, click here.