Pages

Showing posts with label Christmas. Show all posts

Friday, December 28, 2018

Candle Heart Cutout ~ with Cyndy G

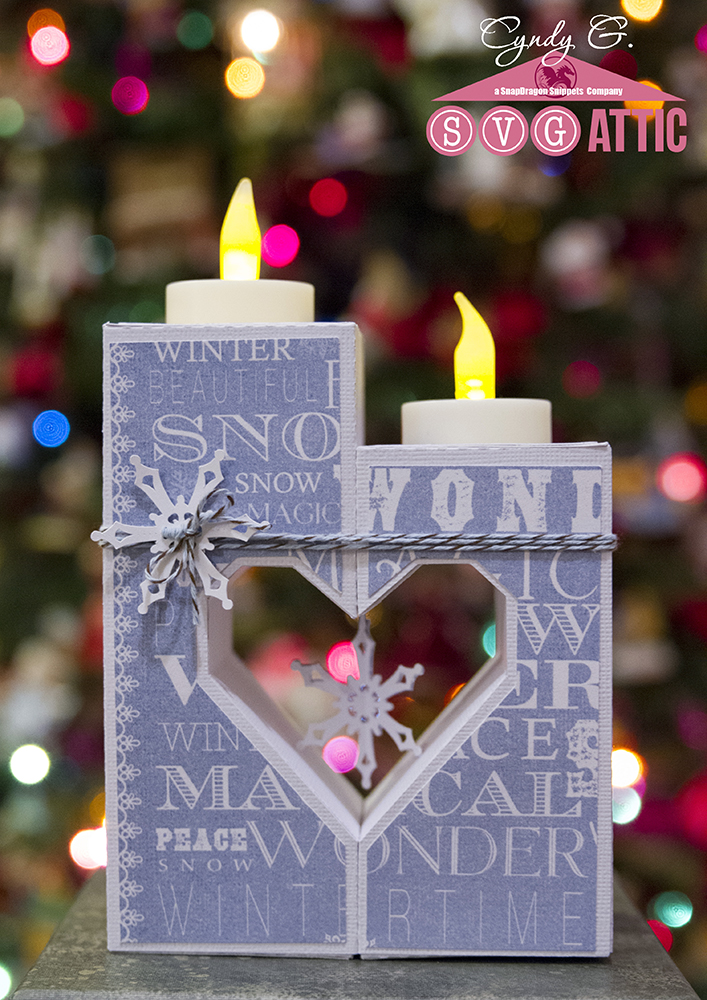
Hello Cyndy from Cyndy G Time Made For Me.  Today I am sharing a project from SVG Attic.  The Candle Heart Cutout 3D Boxes.  These boxes are so cute and not too hard to put together.  Instead of doing mine in the Valentine theme I used winter paper. 

3d Candle with heart shaped cutout

I also added the slice form snow flake from the SDS Ornament Kit.  The snowflake is 2" tall.  Since I made it so small I only cut three snowflakes for the center.  

3d Candle with heart shaped cutout

I used a forth snowflake as an accent on the tall candle and tied some Chocolate Sprinkles Trendy Bakers Twine around the candles.  The lights are just the short tea lights or if you have them you could use a tea light that has the look of a melted candle.  

New to SVG Attic?  Check out these awesome places!


Do what inspires you,
Cyndy G

Wednesday, December 19, 2018

Pillow Boxes Make Great Gifts


Tracy here from the Idea Closet and today I am sharing a new project for SVG Attic.

I don't know about you, but I feel like the last couple of weeks have flown by!
My to do list didn't get done and now its time to finish up all the projects that were started.

These little Pillow Boxes are perfect for last minute gift ideas.  
There isn't many pieces and they go together quickly.  
You could even have an older child help you.


Reindeer Pillow box


and Santa Pillow Box.

The boxes were so cute, I really didn't change them up at all.

I did add the label from the reindeer box to the Santa box and tied both of them with some twine.

Filled with some candy or gift cards, they will make great little gifts. 
In fact, I think I will make a few more to have on hand for those  "just in case" moments.

Both files can be purchased separately or as part of the 

Thank you for joining me today!

Monday, December 17, 2018

Christmas Hair Bow with Beth

Good morning to all my crafty friends!  Today is my day to post on the SVG Attic blog.  This is a very busy time of the year for me, as it is for many of you, I am sure!  The project I am sharing today is a little different than usual.  It is a Christmas bow made out of felt for my baby girl!
I started out by picking the colors of felt that I wanted to make the bow out of.  The glitter gold is not actually felt, but is found by the felt in my craft store.  It worked well in the same way as the felt did for my project.
Next, I cut pieces of the Bow 3D Lattice 2 Layer file (is also part of the Decorated Large Tote Gable Box file) out of Reynolds Freezer Paper.  The parts of the file that I used were the solid bow and the straight tails.  I also broke apart those pieces in my software and deleted the holes that were in the original files so I was left with the following pieces:
The measurements for the pieces above were (top to bottom) 5.25" wide, 4.5" wide, 3.75" wide, and 2.75" wide.  The next step was to iron the freezer paper shiny side DOWN onto the back side of the felt.  Use medium low heat on your iron (or a polyester setting) and use a thin pressing cloth.  You know it is heated enough when the freezer paper sticks to the felt.
Here are all of the pieces ironed onto the felt.
Next, using a scissors, cut around the freezer paper templates.  Gently peel the freezer paper off of the felt.  Your pieces will look like this:
Using a hot glue gun, add a dot of glue to the center of the bow, fold in one end, then repeat for the other side of the bow.  Assemble each bow piece the same way, then use hot glue to build the bow from the bottom up, starting with the tail piece, then largest to smallest bow piece.  I tied a piece of gold ribbon around the assembled bow and added a Christmas button to finish it off.
Here it is on my little sweetheart!  Now she is ready for Christmas!
I hope you have a wonderfully crafty day!

New to SVG Attic? Check out these awesome places!

Sunday, December 16, 2018

Christmas Time

Hello - Helle from www.mycreativehideout.com has seized control of the blog this fine 3. Sunday in Advent.

I want to show you what I've been up to this past week. It involves these:


I fell in love with them instantly and knew exactly what I wanted to used them for.

Christmas Tags for this years presents!

I used the Tag Thanks Latte and stripped away everything but the scalloped base and the inside circle.


I didn't feel like making a very detailed tag because I felt the dome, the glitter and the small image inside the dome was details enough.

I used DCWV "Christmas Plaid" paper and Tim Holtz Ideaology Gold Kraft-Stock for the tag.

Inside the dome is a print and cut motive of pinecones with branches from Carta Bella's "Let it Snow" collection along with Diamond Sugar Dust from Craft Décor.

I embossed and sanded the gold paper for effect and used gold twine to tie it unto the presents.


And I didn't stop here…..

I was on a roll with these domes and decided to use them for this years place cards for the Christmas Table:


The place cards are the JGW Snowflake Placecards.

They are made from Kraft Cardstock, Ideaology Gold Paper, white pearl paper and Best Creation White Glitter Paper.

Inside the dome is a print and cut from Carta Bella's "Christmas Delivery" collection and Diamond Sugar Dust from Craft Décor. I also wrote "Merry Christmas" in Danish.


Instead of using a candy inside the tag, I used snowflake printed vellum to write the names and decorated with a border of a snowflake circle (design ID #34350) I found in the Silhouette Design Store.

Then, for a fun detail, I placed a small led light inside the tag:


It's a bit hard to see in the picture, but it really lights up the name nicely.

As a final detail, I tied some gold tinsel on top of the place card.

And there….I'm all set for Christmas now.

Thanks for joining me today. I'm back again next Sunday for a final Christmas project.

New to SVG Attic? Check out these awesome places!


Friday, December 14, 2018

Nutcracker ~ with Cyndy G


Hello crafters.  This is my favorite time of year.  I love all the Christmas decorations and children’s Christmas programs.  We recently saw my niece perform in the Nutcracker.  It is such a sweet story with all the scenes that make you think of Christmas.  It made me thnik of the Nutcracker boxcard from the CG Nutcracker Dream. 

Nutcracker box card

Nutcracker box card

I just love this card.  I did mine in soft colors but I know it would look amazing in rich reds and greens.  I added a button clock face to my clock and several other small details to my tree and front banner.  

Nutcracker box card

What a wonderful card to give to a child or adult who had performed in the Nutcracker!  Thank you for stopping by.

New to SVG Attic?  Check out these awesome places!


Do what inspires you,
Cyndy G

Sunday, December 9, 2018

Bells Will Be Ringing

Last Sunday I showed you some 3D Christmas ornaments I'd made and that kinda kick-started my brain to come up with some more.

I really enjoy making ornaments because I get to play with all my Christmas papers, get glitter all over the place and get to watch the beautiful ornament that I made on our Christmas Tree.

This Spring, SVG Attic released a kit called Liberty Lane and in this kit, you will find a 3D Liberty Bell Box that is perfect for 4th. of July but also for Christmas.


To make it into a Christmas Bell, I omitted the Yoke and used the panels without the crack.

I made two bells and they are downsized by 50%. I used the Bow 3D for Large Package that I also downsized by 50 % and the Sprigs from the Pine Sprigs Window A7 Card (also downsized but only slightly)

The Bells are hot glued together at an angle. I tied some gold twine onto the middle of the Bow and then added the Bow and Sprigs also with hot glue.

The Bells are made from AC Cardstock in Vanilla and Gold Glitter paper from Artemio. The Bow is made from patterned paper from Graphic 45's "St. Nicholas" and the Sprigs are made from green pearl paper.

Finally I also added two small gold Jinglebells at the bottom of the bells.

A very cute addition to my ornaments if I may say so myself.

Thanks for joining me on this 2nd. Sunday of Advent. I hope the rest of your day is filled with Christmas "hygge"

Happy Birthday Jodi!

New to SVG Attic? Check out these awesome places!


Friday, December 7, 2018

Sleigh Bells


Hello and welcome, everyone! 

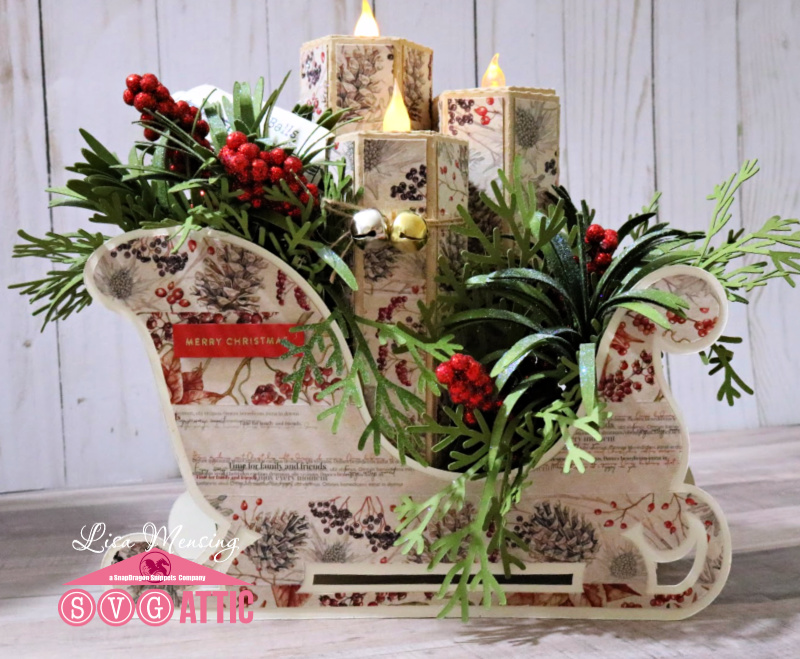
Lisa from The Relativity of Paper bringing you another Christmas project. I've paired two amazing sets to create my project for today and I'm so excited to share it with you all. 

I paired the sleigh from CG Nutcracker Dream Set with the candles and greenery from the Centerpiece Tray with Candles and Greenery Set. 


 I used 12 x 12 Kraft cardstock, lined it with Alexandra Renke Washi Tape for the sleigh accent pieces while the Silhouette cut the sleigh. I repeated the process for the candles. I let the greenery cut while I started assembling the sleigh. Once the greenery was cut and assembled, I used floral wire to create two bunches one larger than the other to arrange around the candles. 

 I used the Silhouette to sketch the sheet music and title, then rolled and hot glued into place. 

 The red berries are from Christmas picks I had in my craft room. 
I'm sure a few are wondering why the silver and gold sleigh bell. It's a little nod to my dad. Every year when Burl Ives comes on the radio singing Silver and Gold my dad belts out the lyrics, "Silver and gold, silver and gold".  Memories that I cherish. 

Thanks for stopping by! 

As always, thanks for joining us! 
New to SVG Attic? Check out these awesome places!
SnapDragon Snippets 


Wednesday, December 5, 2018

Santa Wood Block- Made From Paper


Tracy here from Idea Closet and today I am sharing a new project with SVG Attic.
I love wood blocks but they can be heavy and hard to store.  

SVG Attic has this super cute Santa Wood Block kit, but the secret is it is 100% made from paper!

The file is part of the Just Be Claus Kit collection from SVG Attic.


To give my block a real wood feel,  I inked the edges of the box and the paper with a dark brown stamp pad and made it look like it had been stained. 

The hat cuff is cut from a printed paper with a wood look to it.

The beard and mustache were run through my Big Shot with a Snowflake embossing folder.


For even more details, I created some "sprigs" to place with the holly.
To make the sprigs, I used the head of the reindeer from the reindeer pillow box, also included in the collection. 

I also cut 3 berries to cover up the base of my new "sprigs".

For the eyes, I had some black epoxy dots.

The project is pretty straight forward, however if you get stuck, Jodi has great instructions here.

I am so happy with my paper-wooden block.

Thank you for joining me today.


Monday, December 3, 2018

Laurel Wreath Impossible Card with Beth

Good morning to all my crafty friends!  Beth from Beth's Beauties here with you today.  I am sharing my version of the SVG Attic Laurel Wreath Impossible Card.
These cards are quite simple to make, once you realize how they are made!  Jodi has a great tutorial HERE if you get stuck.  I used patterned papers from DCWV's Red & White Christmas stack and solid papers from DCWV's Flipside Christmas stack.  The leaves are inked with dark green chalk ink and the embellishments include an organza bow and red Stickles.  I used Scotch tacky glue to assemble the card.
 I added a stamped sentiment from the APB Merry Christmas stamp set.  Now it is ready to send to someone special for Christmas!

I hope you have a wonderfully crafty day!

New to SVG Attic? Check out these awesome places!

Friday, November 30, 2018

Santa Countdown ~ with Cyndy G

Good morning, I hope everyone had a wonderful Thanksgiving.  I always enjoy spending the day with my family.  I can't believe Christmas is just four weeks away.  If you enjoy doing an advent calendar then now is the time to get it out.  Today I am sharing the Santa Star Pockets Countdown, the file does have two parts so make sure you pick up both parts.

 Santa Advent Calendar

I shrunk my Santa.  I cut him at 58% and as you can see it is still pretty big.  Mine came out to be about 24" long and 7" wide.  I used one sheet of Graphic 45 for the pockets and the rest is just some heavy cardstock.

Santa Advent Calendar

This project was easy to put together but except to spend the better part of a day to finish this project as there are a lot of little pockets to put on.  Thank you for stopping by today.


New to SVG Attic?  Check out these awesome places!


Do what inspires you,
Cyndy G

Friday, November 23, 2018

Merry & Bright


Happy Friday! I hope everyone is enjoying their Thanksgiving holiday and hopefully, you survived the craziness if you ventured out for Black Friday sales. 

Lisa here from The Relativity of Paper and since we are officially in the holiday season I thought I would decorate my craft room with a few things by SVG Attic. 


My color inspiration came from the felt garland. 
I started with the Banner from the Sweet Shop Party. This is one of my favorite sets from SVG Attic. The banner is easily customized just by adding your own text to it. 


Using Blu Raspberry, Red Hot, and Green Apple cardstock to cut the top overlay banner with the sentiment then cut a solid banner using Madero Beach cardstock, adhered the two together. Using a red and white bakers twine to hang the banner. 


The 3D Tree Hex Base is so fast to cut and assemble. These would be so cute on a mantel, centerpiece, any time of year. I used DCWV Favor Boxes Stack to create the green and red tree, Lawn Fawn Perfectly Plaid for the smaller tree. I was going for a retro feel so I added the Pom Pom Fringe around the base of each tree with quick dry adhesive. 

To create balance I added Snapdragon Snippets snowflakes, design #22595.  


Thanks for stopping by! 

As always, thanks for joining us! 
New to SVG Attic? Check out these awesome places!
SnapDragon Snippets 


Monday, November 19, 2018

Tiny Treat Boxes with Beth

Hello everyone!  Beth from Beth's Beauties here with you today.  I created these tiny treat boxes using SVG Attic's Mini Treat Place Card file.
The original file creates a box that is only 1.25" tall, but I enlarged these just a bit so they could hold a little more.  The papers I used are all from DCWV's Red & White Christmas stack.  The design is super simple to assemble, but directions can be found HERE if you need them!
The tags are included with this file and I stamped them with VersaMark ink and sentiments from APB Merry & Bright stamp set.  I heat embossed them with silver glitter embossing powder for a bit of sparkle and shine.  I then tied them to the wrap around the box with Peppermint Stick and Stormy Trendy Twines.  Inside the boxes I added money and Hershey's Kisses.  These will make great stocking stuffers for Christmas!

I hope you have a wonderfully crafty day!

New to SVG Attic? Check out these awesome places!