Pages

Monday, July 30, 2018

More Christmas in July

Hello, Helle here - thanks for joining me today.

I have briefly taken over the blog today to show you a Christmas project I just made. Yes.....I want in on that Christmas in July too.

I've been meaning to make this one for a looooong time, but as you know, Jodi keeps putting awesome stuff out there so I got distracted, but now I finally succeeded.

The 3D Church Card Holder from the JGW Colonial Christmas kit:


I made the Church in AC Cardstock in Vanilla and decorated with Graphic 45 papers from the Christmas Carol Collection.


I inked all the edges with Chalk Ink from Ingvild Bolme and added a poinsettia from Prima to the front of the Church.

Now it's ready come Christmas time for all the Christmas cards coming in from near or far...…

….or simply as a Christmas decoration with lights in it.


Thank you for stopping by today and Ehm....Merry July Christmas.

New to SVG Attic? Check out these awesome places!


Friday, July 27, 2018

Christmas in July - Part II ~ with Cyndy G

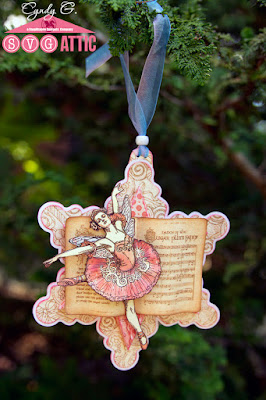
Happy Friday crafters!  Today I am sharing a fun project using the Six Point Star Snowflake from the Winter Illuminations Kit.  I love this file.  I loved the snowflakes just as they are but I wanted to take them to the next level.

Six Pointed Star Snowflake Christmas decoration with ballerina in the center

I used Graphic 45 - Nutcracker Sweet and did a lot of fussy cutting.  The base of the snowflake has three layers, two cut out of patterned paper and one out of thin chipboard.  I used Mod Podge on each individual layer and added the dimensional diamonds to the center.  I used Mod Podge to glue all three layers together and let them dry overnight.  This made the ornament very sturdy.  


Six Pointed Star Snowflake Christmas decoration with Nutcracker and grandfather clock in the center

 While the base was drying I cut multiples of the same image and layered them with foam tape for dimension.  I inked all the edges and used Mod Podge on all the individual pieces.  While the pieces were still wet I molded them, adding waves in the banners, ripples in the ballerina skirts and molded the page cut out to make it look more like a book.  These were also left to dry overnight.

Six Pointed Star Snowflake Christmas decoration with Nutcracker in the center

The next day everything was ready to assemble.  This is one of my favorite paper collections and I am very please with how my ornaments turned out. 

Six Pointed Star Snowflake Christmas decoration with two ballerinas in the center

  Thank you for stopping by.

New to SVG Attic?  Check out these awesome places!


Do what inspires you,
Cyndy G

Wednesday, July 25, 2018

Christmas in July

Hello all. Sonja with Sugar Bean Cards here to share with you my version of the newest Snowman Box Card found on SnapDragon Snippets site.

I started with two sheets of Bazzill Papers Coconut Swirl cardstock to cut out all the white portions. Then I dipped into my scrap papers to cut out the rest of the shapes.
I ran the white portions through the Sizzix Big Shot with a Darice polka dot embossing folder
 Just to add a bit of texture that looks like snow.
I wanted my tree tops and roof to look like it had snow on it so I took the slicing tool in Silhouette Studios, selected the freehand option, and sliced the tops off.
Final Project: 


Materials Used: 

  • Paper
    • Bazzill Papers
      • Milkshake
      • Coconut Swirl
  • Die Cut Machine
    • Silhouette Cameo 3
    • Silhouette Studio-Designer Edition
  • Adhesive
    • Aleene's Original tacky glue
  • SVG Attic/SnapDragon Snippets File
  • Extras
    • Sizzix Big Shot
    • Darice Embossing Folder
FTC disclaimer: I received some of these products for free but was not compensated for writing this post. To view my complete disclaimer, click here.

Monday, July 23, 2018

Be a Unicorn

Hello! Today is my day over on the SVG Attic Blog. I'm excited to share with you my card.  I used the Unicorn Magic Kit


I used Doodlebug Unicorn paper.  I love how it all came together.

For the inside I used a transfer from Chalk Couture Be a Unicorn. Also 2 colors of Chalk Paste, Cherry Blossom and Wild Berry


Thanks for stopping by and make sure to check out all the links.


Sunday, July 22, 2018

Seashore

Hello and a very happy Sunday to you - thanks for joining me today.

I went to the beach today. I normally do not go to the beach, because I hate all the sand that is very hard for a walking impaired person, like myself, to walk in. I don't like swimming in the ocean either because of all the animals (though they are adorable on film) that swim or live in the water.

But I went to the beach today to get some good pictures of my latest project. 

I was very much inspired by my last project when making this - because I thought the Beach house was laking a boat, so my first impulse was to make the cute 3d Rowboat from the new Grab the Bait kit.


I made this in AC Cardstock in Dark Kraft, Bayou, Mint and Pool and decorated it with patterned paper from Prima Marketing Inc "Seashore".

It's a very straightforward project to make with a great tutorial from Jodi the Designer. I inked all the edges with matching chalk ink pads also from Prima and tied a bit of hemp onto the front of the boat as a hawser.

But I didn't stop here because I have had my eye on the adorable 3D Birdhouse Gable Style from the Liberty Lane Kit and now I knew what to do with it :-) My initial idea was to make it as a housewarming gift for my Mother who just moved but now all I could see was…..a Boathouse.


It's made from AC Cardstock in Vanilla, Bayou and Dark Kraft and decorated as the boat, with Prima Marketing Inc. "Seashore"

I did make a few changes on the Birdhouse/Boathouse. 

First of all I deleted the small hole for the perch pole. Then I added a hole for the door on both the house and the panel. Then I created a kinda entry way around the door (just downsized the backpanel) and made hole for the door. This was done using my cameo and the make/release compound path features. The door is made from a rectangle and a circle I welded together on the Cameo and the large and tiny window I snatched from Cyndy's "Cabana Milk Carton" from the CG Under the Sea kit. Then I tied some hemp rope around the entry way, added some bling and a seahorse to the front of the house. And of course a tiny door handle.


I embossed the roof tiles with a Darice Wood Grain Embossing Folder and used three different papers for the raised panels on the side of the house. Finally I added some vellum behind the door and the top window and left out the bottom reinforcement piece, so it was easy to put in a LED tealight. Now it looks like somebody's home a night.

And then I went to the beach and took a couple of great shots of the whole project.


I really hope you like my version of the Birdhouse - now Boathouse and the little Rowboat. Both projects are downsized to 75% of the original and are now a wonderful reminder of my hometown of Grenaa located right out to the ocean. Hmmmm….. Sonja's lighthouse would be awesome next to these.

Thanks for stopping by today - please leave me a small comment below.

New to SVG Attic? Check out these awesome places!


Wednesday, July 18, 2018

Unicorn Card Box and Favor


Hello everyone, we have made it half way through the week.
Tracy here from the Idea Closet.
I always look forward to Wednesday because not only is the weekend a little closer, but it is my turn to post on the SVG Attic blog, and today I have a special treat.

If you love Unicorns you will want to make these.


The first project is the Unicorn Candy Cup Place Card.
This little treat holds a filled 2.5 oz plastic cup and is great for any party.


When I thought of  these projects, I was envisioning lots of glitter so I might have gone a little overboard.  

Try Doodlebugs Sugar Coating glitter.  
It is very fine and so pretty. 


The second project is the Unicorn Rainbow 3D Box Card.  I loved this the minute I saw it.
The box works out pretty big at  3.5 x 3.5 x 7. 


There is lots of detail on the box card.
I embossed the clouds with my Big Shot and then added them to the sides with foam pop dots.


Replace the name tag with the Be Unique label, it fits perfectly and your digital cutter can cut the letters that small.


You can't really tell from the picture but I used tons of glitter on the rainbow, sun and parts of the unicorn.

I am really pleased with how this turned out and I hope you will give them a try.
Thank you for joining me!


Monday, July 16, 2018

Baby Cards with Beth

Happy Monday morning!  Beth from Beth's Beauties here with you today with these sweet baby cards.

This baby bottle card svg is from SVG Attic's SDS Rockabye Baby Cards.  It started out as a shaped card, but I wanted it to fit on the front of an A2 card, so I didn't use the shaped card base included in the file, I simply created a shadow layer for under the bottle.  The sentiment was cut with brown vinyl.  The embellishments I used were white Nuvo crystal drops and Totally Lemon Trendy Twine.  Papers are from Craft Smith's Blackberry Lemon paper pad.
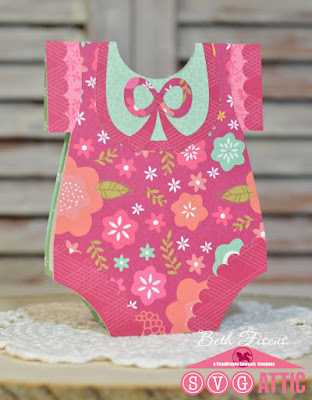
The onesie cards were files from JGW Occasional GC Envelopes & Embellishments.  I sized them to be A2, then I created a shaped card base by duplicating the onesie shape and rotating it 180 degrees, then welded the two shapes at the shoulders.
I couldn't decide which style of papers I liked the best, so I made one out of DCWV's Flower Shop stack and one out of DCWV's Meet Me In Paris stack.  Which style do you prefer?  Whimsical or classic flowers?  Either way, I think they turned out sweet.  Now I have a new supply of baby cards in my stash!

I hope you have a wonderfully crafty day!

New to SVG Attic? Check out these awesome places!

Friday, July 13, 2018

We're All a Little Mad Here ~ with Cyndy G

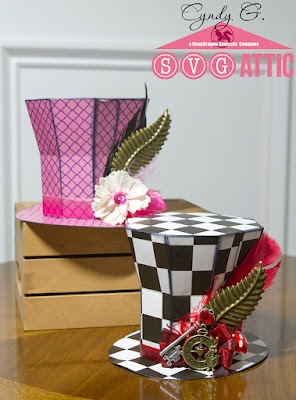
Good morning crafty friends, thank you for joining me.  Today I have a project from SVG Attic using the Mourners Hat from the JGW Raven Quest Kit.  This is my favorite hat file!

Mad Hatter top hat with feathers

I shrunk my hat it stands only five inches tall.  I love these hats in this size.

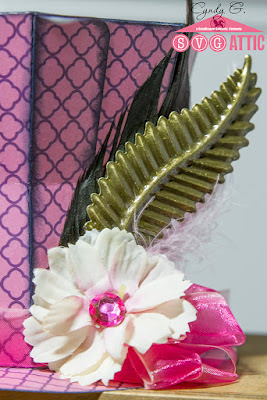
Mad Hatter top hat with feathers

I added some embellishments that I got from Aliexpress.  I love the prices of this store and the shipping was reasonable.  Most items arrived within three weeks. 

Mad Hatter top hat with feathers

  I have always struggled in the past when putting the rim on this hat.  This time I glued the pieces one at a time to the rim and then glued the upper part of the hat together.  It was so much easier to put together this way!  Thank you for stopping by.

New to SVG Attic?  Check out these awesome places!

Do what inspires you,
Cyndy G

Wednesday, July 11, 2018

Tahitian Palm Box

Hello all. Sonja with Sugar Bean Cards here to show you my version of my only chance of a vacation this year! Sadly this will be the closest to the beach I will get.

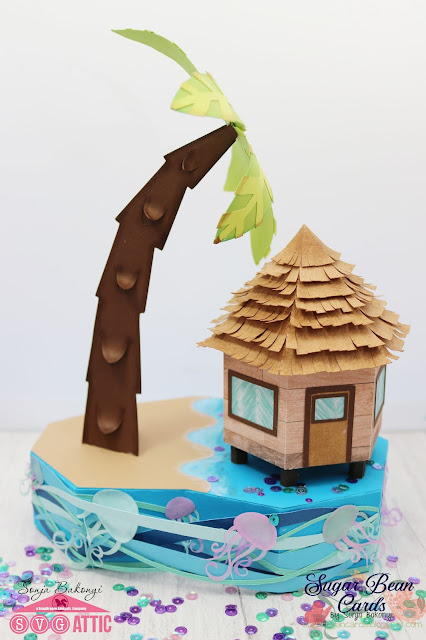
It's been awhile since I've done one of my Tahitian huts. I decided to combine it with the Palm Tree 3D Nut Holder file.

For the hut, I used the Box Hex Med with Lid file. I modified the lid to look like a roof and added some strips of paper for the shingles.
Next, I took the circle (where the cup of treats would go) out and decided to do the box in a blue to signify water.
Next I cut out several Flourished Jellyfish files on vellum and used some simple inks to color the tentacles.
Finished Project:


Materials Used: 

FTC disclaimer: I received some of these products for free but was not compensated for writing this post. To view my complete disclaimer, click here.

Monday, July 9, 2018

Dragonflies in the Sky

Hello and welcome! Tanya from Crafting on Caffeine here today!  I'm so excited to share with you this card! I was asked by a good friend to create an anniversary card for him to give his bride of 19 years! Of course I said YES!!! He said he wanted dragonflies and what he wanted it to say. This is what I created.


I started with the base card from Be Mine double bi fold Valentine a7 card.
I edited out the Flourish and made them a bit smaller to fit the card.


The font is a die from Jaded Blossom.
The paper is Doodlebug Design.
For the dragonflies I used white cardstock and Tim Holtz Distress Oxide Inks to watercolor them.
Sequins are from Kennedy Grace.


The paper inside is embossed with Cloud Die from Lawn Fawn.

Thank you for stopping by for all the details!

Sunday, July 8, 2018

Tropical Paradise


…...is where I just returned from two days ago. 

Hello to you and Happy Sunday. I'm trying to rest from our fabulous Summer Vacation to the Balearic Islands in Spain - more specific Mallorca. Ahhhh it was fun and HOT.

I've tried to recreate the feeling in this project I'm about to show you. I'm starting to long back just looking at it - sigh.

First I made the Pineapple Box from SVGAttic's JGW Tropical Haven kit:


I used AC Cardstock in Lemon, Canary, Squash, Moss, Leaf and Pine and inked all the edges with Ingvild Bolme Chalk Ink. I also used 72 mini glitter brads for the scales.

Such a fun project but time consuming due to the scales on the Pineapple.

The Pineapple is a box and the lid lifts off and then…..


…..it doubles as a drink - Mmmmmm Piña Colada.

The Parasol Straw Slider is part of the cute JGW Tiki Luau kit from SVGAttic and features two more cute sliders.....


......the Sun and the Sea Turtle Straw Sliders. Cute aren't they?

The 3D Coconut Drink is made from the same file as the Pineapple but I left out the top and the scales. Instead I embossed the panels with a Cuttlebug Embossing Folder and inked all with Ingvild Bolme Chalk Inks. The cardstock is AC in Cheastnut for coconut and Lemon, Goldfish, Moss and Leaf for the sliders. Both straws are from AC.

Next I made a pair of Flip-flops also from the JGW Tropical Haven kit:


These are made from AC Cardstock in Fireberry, Goldfish, Moss and Lemon and decorated with patterned paper from Carta Bella "Summer Splash".

All edges are inked with Ingvild Bolme Chalk Inks and the two red brads are from my ever growing stash.

The Flip-flops are also boxes so treats or gift cards can be placed inside. They are very easy to make.

No tropical paradise without flowers……


…...so I made the Lei from the JGW Tiki Luau kit.

I wanted it to be very colorful to match the awesome paper from Carta Bella, so I used AC Cardstock in Fireberry, Pool, Blossom, Lemon and Moss for it. I found some metallic colored beads in my stash to use as spacers.

This was the easiest of the all - just make the flowers and leaves and tread them onto the string - voila! Cool children's project I would think.

Finally I made a card to go with rest of the things:


This Stay Cool Tropical Box Card is also from the JGW Tropical Haven kit and is made from AC Cardstock in the same colors as the rest of the project and decorated with the patterned paper from Carta Bella. 

I get so many withdrawals just looking at it.

And here you have the whole set:


Yes - I cheated and made the whole thing in advance - come on.....nobody makes this much in two days. Ehm.....almost nobody…..hmmmm I kinda did. Oh well…..I'm a nut.

Thanks for stopping by. I hope you enjoyed my creations as much as I did and that you got a bit of a feel of Tropical Paradise.

New to SVG Attic? Check out these awesome places!