Pages

Friday, October 30, 2015

Happy Halloween Truffle Boxes with Lisa

Happy Friday! Lisa here from, In the Crafting Cave, sharing one last Halloween 
project with you. I used the Plain Truffle Box from SVGA Sweet Shop Party Collection 
to make these Spook-tacular gifts. I love these Plain Truffle Boxes because you can use them for 
every occasion under the moon and they are easy peasy to make. 


SVG Attic Sweet Shop Plain Truffle Box Halloween
I used The Paper Studio Jeepers Creepers 12 x 12 papers. I stamped the sentiment using Staz On Pumpkin ink, tied the ends with orange, white and black baker's twine. I made all nine of these in an hour, running two cutting mats back to back. 

SVG Attic Sweet Shop Plain Truffle Box Halloween
I added seven peanut butter cups but they will hold more. These boxes measure 10.25" in length and 1.75" in height but they can be made smaller.
SVG Attic Sweet Shop Plain Truffle Box Halloween

I hope you all have a wonderful weekend filled with lots of family, friends and candy! 
Happy Halloween! 


Wednesday, October 28, 2015

Vinyled Ceramic Pumpkin with Beth

Good morning!  Beth from Beth's Beauties here.  Halloween is only a few short days away, so I decided to decorate this ceramic pumpkin for today's post.
The files from SVG Attic that I used on my pumpkin are the "F" Split Monogram (or you can purchase the whole split monogram alphabet HERE) and the swirls are from JGW Raven Quest.
To prepare the ceramic pumpkin, I sprayed it with white matte spray paint.  Then I watered down black acrylic paint and dripped it down the crease lines to make a more grungy look.  Here is a side view.
Yes, even the back is vinyled!  I used orange and black permanent vinyl so it would for sure stick well.
Here is a close up of what I did to decorate the stem.  I painted it black and then wrapped Orange Licorice Trendy Twine around it.  Then I added a bow of burlap ribbon with a button in the center.
Last year I added vinyl to a real pumpkin.  If you want to see that post, click HERE.

I hope you have a wonderfully crafty day!

Monday, October 26, 2015

My Cornucopia Display

Hello and Happy Monday! Hope you all are doing well! Tanya from Crafting on Caffeine here today, I needed a break from Halloween so I decided to do something for my table at Thanksgiving. Hope you enjoy! 


I used the following SVG Attic collections to put this together. The Cornucopia is from SDS Pilgrims Prayer. The pumpkins are from Fall Harvest Favor Boxes SVG Kit. The apples are from JGW Fall Ensemble. And the Pinecones are from JGW Santas Repose.


I used my eBrush to give the edges of everything just the right touch. 


I also used the following to put finishing touches on everything.

Hope you got some inspiration to create your own! 

Sunday, October 25, 2015

Monster Treats ~ with Cyndy G.

I wanted to pop by and share with you a very quick and cute project today.  If you find that you need a quick and easy bag for giving some treats for Halloween this might be the project you are looking for.

Monster treat bags

This cute little monster bag can be found in the JGW Monstrously Munchie Party kit.
I whipped up these little bags for my kids and niece's. 

Monster Treat Bag

I used some older paper I had from K & Company.  But don't you think these would look adorable in polka dots or stripes?  I enlarged this bag as big as it would go on my 12x12 mat.

Do what inspires you,
Cyndy G. 

Friday, October 23, 2015

Mourner's Hat ~ with Cyndy G.

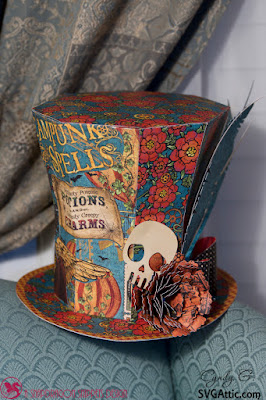
Today I want to share with you my Mourner's Hat from the JGW Raven Quest Kit.  I have been wanting to get the hat made using my Graphic 45, Steampunk Spells paper.

Mourner's Hat

I love this hat and I love how it looks with this paper.  

Mourner's Hat


I did have to cut out the image of the lady and the title Steampunk Spells to get them to show the way I wanted on the hat.  I am very please with how everything came together.

Thank you for stopping by!

Do what inspires you,
Cyndy G.

Wednesday, October 21, 2015

Spiders Webs and Magical Orbs

Tracy here from the Idea closet and its my turn again to share a project with you.
At our house this week we are getting ready for Halloween Parties!
I love decorating for Halloween but I wanted to do something a little different this year.


Spiders are just gross if you ask me or any of my girls. 
(did you see the post about the guy who set his car on fire trying to kill a spider?  Yeah I could so see myself doing that.)
However I think spider webs are kind-a cool, especially for Halloween décor, so this year I used a spider web theme and made some" Magical Orbs"


To create the Magical Orb you will need a few plastic Christmas ball ornaments.
Remove the little cap and hanging piece.

Next use the spider web file from the Whats Brewin? kit from SVG Attic.

What's Brewin'?

You will fill the spider web with black and then print it onto clear transparency plastic.
Next cut a circle around it.
Roll the plastic up and place it inside the ornament.
Basically you are creating a floating ornament but upside down.

Now you will want to create the stands to put them on.


For the first stand I created the Spiderweb Candlestick using the 

Creepy Candelabras

I love every file in this kit and will be using all of them I am sure.
The Candlestick was really easy to cut out and put together.

Once it was finished I used the glue gun to glue the "magical orb" into the top and then added some black tulle.


For the other "magical orbs" I used the 3D candlestick file from the new


JGW SteampunkHex

(Another great kit!  So many fun things to create!)

This time I made two of the candlesticks.  Once they were assembled, I inked the edges with a grey chalk ink.  
The Orbs are glued into the top of the candlestick holders using the glue gun.

To create the small banner, cut as many spider webs from cardstock as you want to use.
I cut them in different sizes to mix it up just a little.

Ink the webs with the grey chalk and then go over them just a touch with a white chalk.

String the webs onto clear quilting thread.

Tie each end of the thread to one of the candlesticks.

Tie black tulle in between some of the webs.

To finish it off, Tie a big bow around each of the candlesticks.


I love how these turned out and I feel ready to host our Halloween party now!


Tuesday, October 20, 2015

Welcome Baby Boy!

Hello crafty friends!  Today we are sharing cards that all of the SVG Attic Inspiraiton team created to welcome the newest addition to the SVG Attic family!  Mike and Kenzie, the owners of SVG Attic, will welcome a baby boy into their family very, VERY soon and we are so excited for them.  

Below you will see what each of the I-Team members created.  You can click on their name to be taken to their blog for all of the details on their projects.  The sets that they used are listed as well. 


Inside view of the card


We all want to wish Kenzie and Mike the very best over the next couple days as they add another blessing to their family!

Monday, October 19, 2015

Mr & Mrs box letters with Angeline

Good Monday!
Angeline here to share with you a wedding project I did over the weekend. 

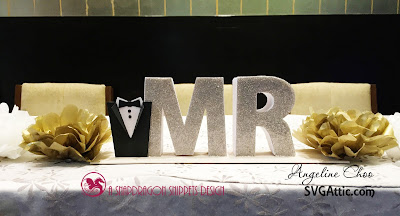
I used the SDS 3D Box Letters kit to make this Mr & Mrs signage. 
I glued the letters together and added lots of glitter to it! 

I also used the tuxedo and wedding gown from the JGW Wedding Wishes box card.

SVG Attic: Mr & Mrs box letters with Angeline #svgattic #scrappyscrappy #wedding #boxletters #mrandmrs

SVG Attic: Mr & Mrs box letters with Angeline #svgattic #scrappyscrappy #wedding #boxletters #mrandmrs

Am very glad the couple liked it! *yay*!

Thanks for stopping by.

Angeline Choo
blog // facebook // instagram // youtube

Friday, October 16, 2015

Ghostly Globe with Lisa


Happy Friday! Lisa here, from the The Crafting Cave,  ready to share another Halloween 
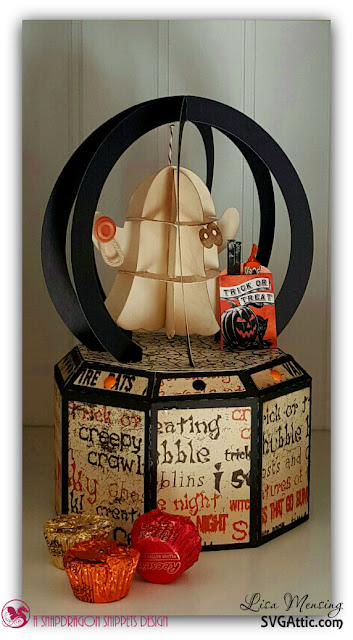
project with you. I used the Snowglobe Box from JGW Snow Flurries
Collection and 3D Ghost from SDS Ghostly Graveyard
I think this is a really fun way to give a little Halloween 
gift! There's plenty of room in the box to put candy, tea lights, gift cards and more.
SVG Attic JGW Snow Globe and SDS Ghostly Graveyard
 I punched a small hole in the back arch to hang the ghost from.
SVG Attic JGW Snow Globe and SDS Ghostly Graveyard
 The box holds an 11oz bag of Reese's Mini Peanut Butter Cups perfectly.
Just to give you an idea how big it is. I measured the globe at 8in. tall and about 5.5in wide.
SVG Attic JGW Snow Globe and SDS Ghostly Graveyard
This would be a perfect gift for teachers and/or neighbors.
You can find all the details and supplies list on my blog, The Crafting Cave.
   Be sure to checkout all the fun Halloween Collections in the store. 

Thanks for stopping by today.
I hope you a weekend filled full of Boo-tiful Crafting!

Wednesday, October 14, 2015

Halloween Boxes with Beth

Happy Wednesday!  Beth from Beth's Beauties here.  I have been crafting like crazy for Halloween lately.  Here are the treat boxes that I made for my boys this year.  They are from SVG Attic's Halloween Character Boxes set
I kept them very simple, just adding some fun crinkle seam binding and adhesive pearls.


These boxes are the perfect size to add a couple fun size candy bars.  They were quick to cut out and very easy to assemble too!
 
If you want to see the treats I made for my boys last Halloween, head on over to THIS blog post.

I hope you have a wonderfully crafty day!

Monday, October 12, 2015

Halloween Cards by Tanya Hahn

Hello, Tanya from Crafting on Caffeine here today. I decided to do a couple of cards for you today. Hope you enjoy.  Both of these are from SDS Spooky Cards Collection, so much fun and so easy!
For my first card I did edit it a bit. I removed the cut out for the windows on the card base. I wanted to put a stamp of a skeleton looking out the window, looks so cute. I then added a banner. On the banner I did add a black sprinkle and then doodled a few (8) legs. hahaha


On my second card I cut the candy corn pattern out 2 times. One with the pattern paper and then 1 with white paper. I then took the candy corn layers and left the white tops alone. but then used my eBrush to do the orange and yellow layers. Turned out Exactly how I had it in my head! 


Also used:

Thanks for checking out my cards. Would love to see any you create. Have a great day!

Sunday, October 11, 2015

Mourner's Hat By Christi

Good Morning!  It is a beautiful , crisp  Sunday here and I wanted to share a Halloween project with you.  I choose the unique Mourner's hat in the JGW Raven Quest Collection.

I am always looking for unique Halloween decorations for Halloween.  It is my youngest daughter's favorite holiday.  She even got married on Halloween 2 years ago and collects many beautiful pieces to keep up all year round.  I thought this was something she could add to her collection.


Here are some close ups of the Flowers which are made by Prima.  I just fell in love with these flowers when I found them and they have been in my stash FOREVER and was saving them for that special project.  Well....this was that project.


Next came the bling!  Every project isn't complete without a little bit of bling!  This is Paper Studio from Hobby Lobby.


Last by not least I made the bow but added Mays art Black Ribbon to the center and around the brim of the hat.  I also added  a beautiful full purple feather and a small turquoise with black feather for that small touch of extra color.  

I hope you have enjoyed my mourner's hat as much  I did making it .  Have a wonderful Sunday and a BEAUTIFUL week!  

Blessings!  


Friday, October 9, 2015

Spooky Halloween ~ with Cyndy G.

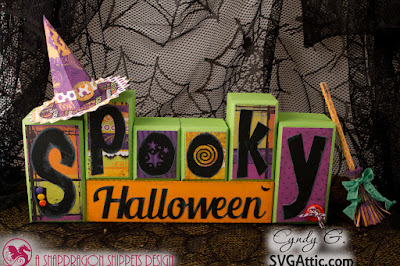
The count down is on, Halloween is three weeks away.  It always amazes me how time continues to speed up as you get older!  Halloween is definitely one of my favorite holidays.  I love all the different directions you can go with your decor; spooky and scary, or colorful and cute.  I choose the later for this project.  I decided to make the  Spooky Halloween Block Boxes from JGW Batwing Brew.

Spooky Halloween block set

I pulled out some of my old stash of paper and finally found a use for some 
We R Memory Keepers paper I have been holding on to.  

Witches broom

I love the way my witches broom from the JGW 3D Witch kit turned out.  
I used some crinkle ribbon from 3 Girl Jam, one of my favorites!

Witch hat

The witches hat is also from JGW 3D Witch kit.
This hat goes together so quickly.

Block letter "S"

I added a few dots, buttons and a bat brad for dimension. 

Halloween block

I also added a touch of Trendy Twine Grape Fizz.

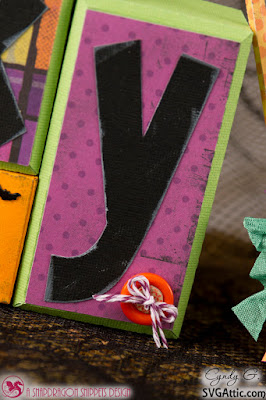
Block letter "y"

I just love how everything came together.  
I hope you have enjoyed my project today.  
I look forward to seeing all your Halloween projects!

Do what inspires you,
Cyndy G.